DCB
Daily Cloud Blog

Azure Migrate: An Overview + Step-by-Step Demos

Discover • Assess • Migrate • Modernize — a practical guide to Microsoft’s migration hub.

Agent-based Migration in the Migration and Modernization Tool - Azure  Migrate | Microsoft Learn
Daily Cloud Blog • Azure Migrate overview

Migrating to Azure can feel overwhelming—especially when you’re dealing with legacy infrastructure, tight timelines, and business-critical workloads.
That’s where Azure Migrate comes in.

Azure Migrate is Microsoft’s central hub for cloud migration. It helps you discover, assess, migrate, and modernize
workloads moving to Azure—while keeping everything tracked in one place.


What Is Azure Migrate?

Azure Migrate is a service in the Azure portal that provides a single migration experience for moving:

  • VMware workloads
  • Hyper-V workloads
  • Physical servers
  • Applications and databases
  • Data and file servers

It’s not just one tool—it’s an orchestrator that ties together discovery, assessment, and migration tooling so you can plan confidently and execute in waves.

Daily Cloud Blog Note: Most migration issues come from skipping discovery, underestimating dependencies, or mis-sizing workloads. Azure Migrate is designed to prevent those surprises.

Core Components of Azure Migrate

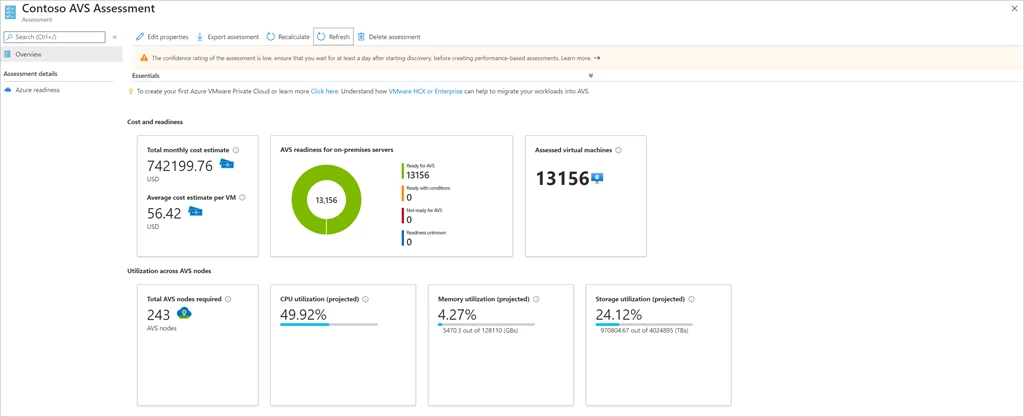
1) Discovery & Assessment

Azure Migrate discovers your environment and answers:

  • What do we have (inventory)?
  • Is it ready for Azure?
  • What size should it be in Azure (performance-based sizing)?
  • How much will it cost?
  • What are the dependencies (app-to-app, server-to-server)?

2) Migration & Modernization

Based on the assessment, you choose a strategy (rehost/replatform/refactor) and migrate with tools like:

  • Azure Migrate: Server Migration (agentless replication for VMware; agent-based options for others)
  • Azure Database Migration Service for database moves
  • Azure Site Recovery–based replication patterns

3) Tracking & Governance

Azure Migrate helps track migration progress and aligns well with good governance:

  • Wave-based execution
  • Readiness checks and reporting
  • Cost planning
  • Security posture improvements when paired with Defender for Cloud

High-Level Workflow

  1. Discover workloads (VMware/Hyper-V/physical)
  2. Assess readiness, sizing, and cost
  3. Plan migration waves and cutover schedule
  4. Migrate with replication + test migrations
  5. Cutover and validate
  6. Optimize (rightsizing, security, modernization)

Common Best Practices

  • Always use performance-based assessments (not “guess sizing”).
  • Turn on dependency mapping early for critical apps.
  • Migrate in waves (pilot → business apps → mission-critical).
  • Reduce DNS TTL ahead of cutover and document rollback steps.
  • Revisit sizing after migration (rightsizing saves big money).

Step-by-Step Azure Migrate Demos

Below are practical demos you can follow in a lab or real environment. Each demo includes the goal, prerequisites, and step-by-step actions.
Replace the placeholders (subscription, region, resource group names) with yours.

Demo 0 — Prerequisites (Do this once)
  • Permissions: Owner or Contributor in the subscription + rights to create resource groups, storage, vaults, and network objects.
  • Target region decision: Choose the Azure region where migrated VMs will live (e.g., East US, West Europe).
  • Landing Zone readiness: Ensure networking, identity, and policies are ready (hub/spoke, DNS, firewall, RBAC).
  • Connectivity: On-prem to Azure connectivity for replication (VPN/ExpressRoute). For labs, public internet can work.
Quickstart to create an Azure Migrate project using Portal - Azure Migrate  | Microsoft Learn

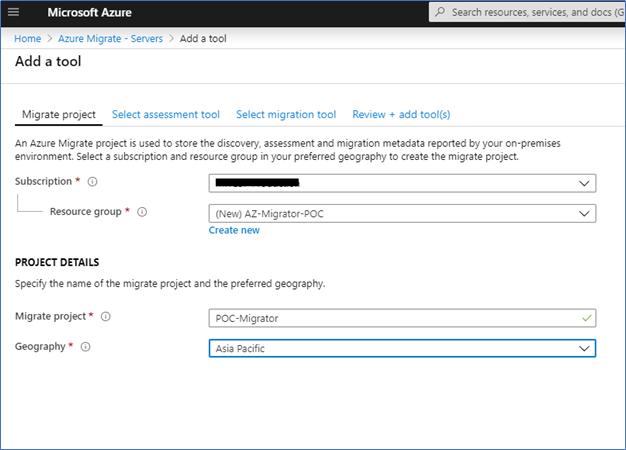
Demo 1 — Create an Azure Migrate Project

Goal: Stand up the Azure Migrate hub to manage discovery, assessments, and migrations.

  1. In the Azure portal, search for Azure Migrate → open it.
  2. Select Servers, databases and web apps (or the relevant migration tile).
  3. Click Create project.
  4. Choose your Subscription, Resource group, and Geography (project metadata).
  5. Name the project (example: dcB-azmigrate-prod) and click Create.
Terminalworks Blog | Azure Migrate | Installing and Configuring Server  Assessment tool

Demo 2 — Discover VMware/Hyper-V/Physical Servers (Appliance Setup)

Goal: Deploy the Azure Migrate appliance to collect inventory and performance data.

Pick your source:

  • VMware: Agentless discovery via vCenter credentials
  • Hyper-V: Appliance connects to Hyper-V hosts/SCVMM
  • Physical/Other clouds: Use an agent-based approach for discovery/assessment (where applicable)
  1. Azure Migrate project → Discover → select source type (VMware/Hyper-V/Physical).
  2. Download the appliance (OVA for VMware / VHD for Hyper-V) or follow the provided setup method.
  3. Deploy the appliance VM on-prem and power it on.
  4. Open the appliance configuration manager URL (shown on the VM console).
  5. Register the appliance with your Azure Migrate project (copy/paste the project key/token).
  6. Provide credentials (e.g., vCenter) and start discovery.
  7. Wait for inventory to populate in Azure Migrate (can take time depending on environment size).
Best practice: Use a dedicated service account for vCenter/Hyper-V discovery with least privilege + audit logging.
Set up an Azure Migrate scale-out appliance for agentless VMware migration  - Azure Migrate | Microsoft Learn

Demo 3 — Run an Assessment (Sizing + Cost Estimation)

Goal: Produce an Azure-ready assessment with recommended sizing and estimated monthly cost.

  1. In Azure Migrate → go to AssessmentsCreate assessment.
  2. Select the discovered servers you want to assess (start with a small pilot set).
  3. Choose assessment properties:
    • Assessment type: Azure VM
    • Sizing criterion: Performance-based (recommended)
    • Reserved instances / AHUB: Select if applicable
    • Target region: Your chosen Azure region
  4. Run the assessment and review:
    • Readiness (ready/conditional/not ready)
    • Recommended VM size
    • Estimated compute + storage cost
Plan your migration to Azure VMware solution using Azure Migrate |  Microsoft Azure Blog

Demo 4 — Dependency Mapping (App/Server Relationships)

Goal: Understand what talks to what, so you can plan migration waves and avoid broken apps after cutover.

  1. In Azure Migrate, open your discovered server list.
  2. Enable dependency visualization/mapping (where available for your scenario).
  3. Select a server → view inbound/outbound connections.
  4. Group related servers into an application/workload group for wave planning.
  5. Document required firewall ports, DNS dependencies, and shared services (AD, file shares, databases).
Best practice: Capture at least 7–14 days of connection data for production apps to avoid missing “monthly” or “weekly” integrations.
Set up Agentless Dependency Analysis in Azure Migrate - Azure Migrate |  Microsoft Learn

Demo 5 — Server Migration (Replicate → Test → Cutover)

Goal: Replicate an on-prem server to Azure and complete a controlled cutover.

  1. Azure Migrate → Server MigrationReplicate.
  2. Select the source server(s) and configure replication settings:
    • Target subscription, RG, VNet/Subnet
    • Target VM size (use assessment recommendations)
    • Disk selection and cache storage
  3. Start replication and monitor status until healthy/continuous.
  4. Run a Test migration to a test subnet (no impact to production).
    • Validate boot, services, app functionality, and network rules
    • Capture issues and remediate before cutover
  5. Plan cutover:
    • Change freeze window
    • Lower DNS TTL beforehand
    • Backups confirmed
    • Rollback documented
  6. Perform Migration/Cutover and validate in production subnet.
  7. Post-cutover: update DNS, monitoring, backups, and security controls.
Screenshot of Test migration.

Demo 6 — Post-Migration Optimization (Rightsize + Secure + Back Up)

Goal: Convert “lift-and-shift” into a stable, cost-effective, secure Azure workload.

  1. Rightsize: Compare actual CPU/RAM utilization in Azure Monitor and adjust VM sizes.
  2. Backup: Enable Azure Backup for the VM (and confirm retention policy).
  3. Security: Enable Defender for Cloud recommendations and remediate high-severity items.
  4. Networking: Ensure NSGs/firewall rules match least privilege. Move to private endpoints where appropriate.
  5. Operations: Add alerts, dashboards, update management/patching approach.
Best practice: Schedule a “Day 7” and “Day 30” optimization review to capture quick savings and stability improvements.

Troubleshooting & Pro Tips

  • Discovery shows zero servers: confirm appliance registration, network access to vCenter/hosts, and credentials.
  • Assessments look oversized: verify performance history window and ensure performance-based sizing is enabled.
  • Replication slow: check bandwidth, throttling, disk churn, and cache storage performance.
  • Cutover issues: validate DNS, static IP dependencies, domain join, and firewall rules.
  • Cost higher than expected: rightsizing + reserved instances + AHUB can materially reduce spend.

© Daily Cloud Blog — Educational content. Validate configurations against your organization’s security and compliance requirements.


Discover more from My Daily Cloud Blog

Subscribe to get the latest posts sent to your email.

Leave a comment

Trending