-
ITIL Overview: Understanding the Framework Behind Modern IT Service Management
IT Service Management | Operations | Governance
ITIL Overview: Understanding the Framework Behind Modern IT Service Management
A practical introduction to ITIL 4, the Service Value System, the Service Value Chain, guiding principles, and why the framework still matters in modern IT operations and digital transformation.
Author: Christian MarreroPublication: Daily Cloud BlogCategory: IT Service ManagementIn modern IT environments, success is no longer measured only by whether infrastructure is running or tickets are being closed. Organizations are expected to deliver reliable services, improve user experience, support business outcomes, and adapt quickly to change. That is exactly why frameworks like ITIL continue to play such an important role in IT operations and service management.
ITIL is one of the most recognized frameworks for IT service management. It provides organizations with practical guidance for creating, delivering, supporting, and continually improving services. Rather than focusing only on technology, ITIL helps teams think in terms of value, outcomes, governance, collaboration, and continuous improvement.
Whether an organization is improving help desk operations, modernizing service delivery, aligning IT with business needs, or building a more mature operational model, ITIL offers a structured approach to make service management more effective.
Key idea: ITIL helps organizations shift from managing isolated IT activities to delivering services that create real business and customer value.
What is ITIL?
ITIL is a service management framework that provides best-practice guidance for how organizations design, deliver, support, and improve services. It gives IT teams a structured way to think about workflows, customer needs, operational consistency, governance, and ongoing service improvement.
At a practical level, ITIL helps answer questions such as:
- How do we design services that actually create value?
- How should teams handle service delivery, support, and change?
- How can IT work more closely with the business and end users?
- How do we measure performance and improve over time?
- How can governance and flexibility exist together in the same operating model?
Why ITIL Matters
Many organizations struggle with inconsistent support processes, poor visibility, siloed operational teams, unclear ownership, and service experiences that frustrate both users and the business. ITIL helps reduce that confusion by offering a framework for managing services in a more disciplined and outcome-oriented way.
In short, ITIL matters because it helps organizations treat IT as a service provider, not just a technical function. It encourages better alignment between operations, customer expectations, governance, and business value.
ITIL 4 and the Modern Service Management Model
The current version in broad use is ITIL 4, which introduced a more modern and flexible model for service management. ITIL 4 places strong emphasis on value co-creation, adaptability, governance, continual improvement, and integration with modern ways of working such as Agile, DevOps, and digital transformation initiatives.
Instead of viewing service management as a rigid set of isolated processes, ITIL 4 presents service delivery as a connected system built around value.
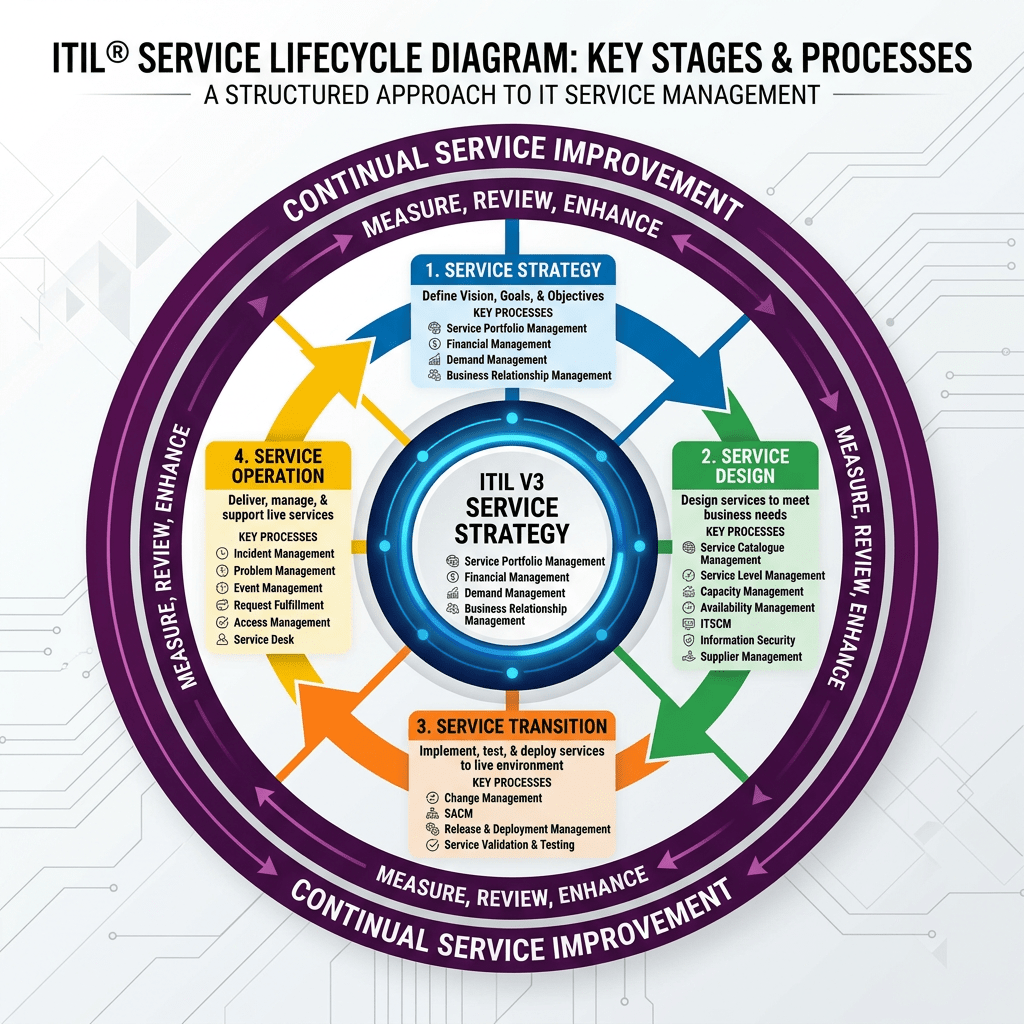
The Core of ITIL 4: The Service Value System (SVS)
One of the most important concepts in ITIL 4 is the Service Value System, or SVS. The SVS explains how the different parts of an organization work together to enable value creation through services.
Rather than focusing only on a service desk or a single operational workflow, the SVS provides a broader model that connects:
- Guiding principles
- Governance
- The service value chain
- Management practices
- Continual improvement
The Service Value Chain
At the center of the Service Value System is the Service Value Chain. This is the operating model that shows how demand is turned into value through key organizational activities.
The six value chain activities are:
Plan
Ensures a shared understanding of direction, priorities, and improvement opportunities.
Improve
Supports continual improvement across services, practices, and all service value chain activities.
Engage
Maintains relationships with stakeholders and ensures their needs and expectations are understood.
Design & Transition
Ensures products and services meet stakeholder expectations for quality, cost, and time-to-market.
Obtain / Build
Delivers service components when and where they are needed, including development, sourcing, and configuration.
Deliver & Support
Ensures services are delivered and supported according to agreed specifications and user expectations.
The Seven Guiding Principles of ITIL 4
ITIL 4 includes seven guiding principles that help teams make better decisions in different situations. These are meant to be broadly applicable, regardless of the specific technology stack, organization size, or operating model.
- Focus on value
- Start where you are
- Progress iteratively with feedback
- Collaborate and promote visibility
- Think and work holistically
- Keep it simple and practical
- Optimize and automate
The Four Dimensions of Service Management
ITIL 4 also emphasizes four dimensions of service management. These dimensions help organizations avoid focusing too narrowly on only one part of service delivery.
Organizations and People
Focuses on culture, roles, skills, team structures, and communication needed to support effective service management.
Information and Technology
Covers the data, tools, automation, systems, and technology capabilities needed to enable services.
Partners and Suppliers
Recognizes that modern service delivery often depends on third parties, vendors, and strategic partner ecosystems.
Value Streams and Processes
Focuses on workflows, activities, controls, and how work moves across the organization to deliver outcomes.
ITIL Practices in the Real World
ITIL 4 uses the concept of management practices rather than treating everything as a traditional process library. This is a more flexible and modern way to frame service management.
In real environments, teams often apply ITIL guidance through areas such as:
- Incident management
- Problem management
- Change enablement
- Service desk operations
- Service level management
- Continual improvement
- Monitoring and event management
- Knowledge management
What Makes ITIL Useful in Practice?
ITIL helps organizations bring structure to service delivery without losing sight of outcomes. It can improve consistency, clarify accountability, reduce operational noise, and create a stronger link between technical activities and business expectations.
It is especially useful for organizations that want to improve service quality, standardize support operations, build stronger governance, and create a culture of continual improvement.
Common ITIL Challenges
Like any framework, ITIL can be misunderstood or overcomplicated. One of the most common mistakes is treating it like a rigid compliance checklist instead of a practical guide for service improvement.
ITIL works best when it is adapted to the organization’s size, maturity, culture, and goals. The framework should enable better service management, not create unnecessary process overhead.
Why ITIL Still Matters in Modern IT
In cloud-first, fast-moving environments, some teams assume traditional service management frameworks are outdated. But the reality is that modern IT still needs reliability, governance, change coordination, support maturity, and clear accountability.
ITIL remains relevant because it provides a strong operating foundation for service management while still allowing teams to integrate modern practices such as Agile delivery, DevOps collaboration, automation, and platform-based operations.
Who Should Learn ITIL?
ITIL is valuable for service desk analysts, operations teams, infrastructure engineers, support leads, IT managers, service delivery managers, and technology leaders who need to improve how services are delivered and supported.
It is especially useful for professionals working in environments where reliability, user experience, governance, and continuous operational improvement matter.
Final Thoughts
ITIL remains one of the most recognized frameworks in IT service management because it helps organizations think beyond isolated tickets, tools, and operational tasks. It creates a more structured way to design, deliver, support, and improve services with value at the center.
Whether the goal is improving support maturity, aligning IT with the business, building stronger operational governance, or delivering better service experiences, ITIL provides a strong foundation for modern service management.
Bottom Line
ITIL is not just about ticketing or service desk process. It is a framework for building reliable, value-driven, and continually improving IT services across the enterprise.
Continue the Service Management Conversation
If you are exploring IT operations, service delivery, governance, cloud operations, or modern infrastructure management, follow Daily Cloud Blog for more practical breakdowns focused on modern IT and enterprise transformation.
Read more articles, share this post with your operations team, and stay connected for more IT leadership insights.
-
TOGAF Architecture Overview: Understanding One of Enterprise IT’s Most Recognized Frameworks
Enterprise Architecture | Frameworks | Strategy
TOGAF Architecture Overview: Understanding One of Enterprise IT’s Most Recognized Frameworks
A practical overview of TOGAF, the Architecture Development Method (ADM), architecture domains, and why the framework still matters for modern cloud, infrastructure, and digital transformation initiatives.
Author: Christian MarreroPublication: Daily Cloud BlogCategory: Enterprise ArchitectureIn modern IT environments, architecture is no longer just about server diagrams, application stacks, or infrastructure layouts. It is about building a structured way to align business strategy, governance, data, applications, and technology platforms into a cohesive operating model. That is one of the biggest reasons frameworks like TOGAF continue to play an important role across enterprise organizations.
TOGAF, which stands for The Open Group Architecture Framework, is one of the most widely recognized enterprise architecture frameworks in the industry. It gives organizations a common language, a structured development method, and a governance-oriented approach for designing and managing architecture at scale.
Whether an organization is modernizing legacy platforms, driving cloud transformation, improving governance, or building a long-term digital roadmap, TOGAF provides a repeatable way to think about enterprise change.
Key idea: TOGAF helps organizations move from isolated technology decisions to a more intentional, governed, and business-aligned architecture practice.
What is TOGAF?
TOGAF is an enterprise architecture framework that helps organizations plan, design, implement, and govern architecture across the business. Rather than focusing on a single solution or technology layer, TOGAF promotes a broader view of how the enterprise operates and how technology should support strategic business outcomes.
At a practical level, TOGAF is used to answer questions such as:
- What is the business trying to achieve?
- What capabilities are required to support that strategy?
- How should applications, data, and infrastructure support those capabilities?
- What standards and governance models should guide implementation?
- How should the organization move from the current state to a target-state architecture?
Why TOGAF Matters
Many enterprises struggle with fragmented systems, duplicate applications, inconsistent governance, and technology investments that drift away from business priorities. TOGAF helps reduce that fragmentation by giving architecture teams a formal process and a shared structure for planning change.
In other words, TOGAF is valuable because it helps architecture become more than documentation. It becomes a decision-making discipline that guides transformation, promotes standardization, and improves alignment between executive goals and technical delivery.
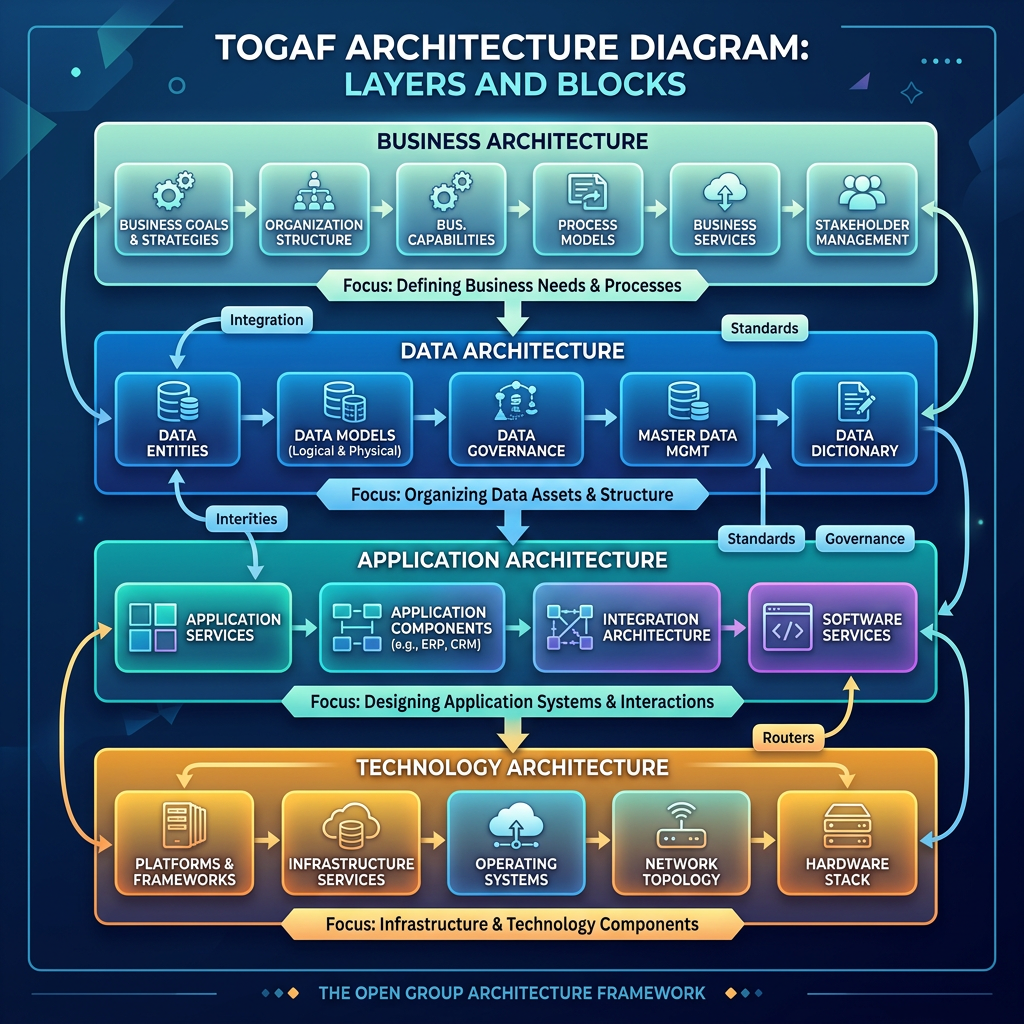
The Four Main Architecture Domains
One of the most useful ways TOGAF structures enterprise architecture is through four primary domains. These domains help organizations think across the full business and technology landscape instead of focusing only on infrastructure or applications.
Business Architecture
Focuses on business strategy, organizational structure, governance, capabilities, and processes. This domain defines what the business needs to do and why.
Data Architecture
Describes how enterprise data is structured, managed, secured, shared, and governed. It supports information consistency and strategic data usage.
Application Architecture
Defines the application landscape needed to support business capabilities and explains how those applications interact across the enterprise.
Technology Architecture
Covers infrastructure, platforms, networking, cloud services, security components, and technical standards that support enterprise systems.
The Core of TOGAF: The Architecture Development Method (ADM)
The best-known component of TOGAF is the Architecture Development Method, or ADM. The ADM is the core process architects use to build, evolve, and govern enterprise architecture over time.
The ADM is important because it provides a repeatable lifecycle for architecture work. It is not meant to be a rigid checklist. Instead, it is an adaptable, iterative approach that can be tailored to the maturity, scale, and needs of a specific organization.
ADM Phases at a High Level
- Preliminary Phase – Establish architecture capability, principles, and governance foundations.
- Phase A: Architecture Vision – Define scope, stakeholders, drivers, and target outcomes.
- Phase B: Business Architecture – Model business capabilities, value streams, and processes.
- Phase C: Information Systems Architectures – Develop data architecture and application architecture.
- Phase D: Technology Architecture – Define infrastructure, platforms, standards, and technical direction.
- Phase E: Opportunities and Solutions – Identify solution options and major implementation work packages.
- Phase F: Migration Planning – Build the roadmap and transition plan from current state to future state.
- Phase G: Implementation Governance – Ensure projects align with approved architecture direction.
- Phase H: Architecture Change Management – Manage ongoing evolution as the business and technology environment changes.
- Requirements Management – Continuously track and manage requirements across every phase.
What Makes TOGAF Useful in Practice?
TOGAF is especially useful when organizations need more than technical implementation guidance. It helps create structure for transformation by connecting business objectives to architecture deliverables such as principles, standards, roadmaps, governance models, transition states, and implementation priorities.
Organizations commonly use TOGAF for:
- Cloud transformation and hybrid architecture programs
- Application rationalization and modernization efforts
- Enterprise governance and standardization initiatives
- Business capability mapping
- Technology portfolio optimization
- Digital transformation planning
- Large-scale infrastructure and platform redesigns
Key Strengths of TOGAF
- Structured and repeatable: Provides a clear lifecycle for architecture development.
- Business-aligned: Keeps architecture tied to business drivers and strategic outcomes.
- Governance-friendly: Supports standards, reviews, and implementation oversight.
- Adaptable: Can be tailored for different enterprise sizes, industries, and maturity levels.
- Comprehensive: Encourages a full-enterprise view across business, data, applications, and technology.
Common TOGAF Challenges
TOGAF can be extremely valuable, but it is not automatically effective just because it is adopted. One of the biggest challenges organizations face is applying the framework too rigidly or turning it into a documentation-heavy exercise with limited operational value.
TOGAF works best when it is tailored to the business, scaled appropriately, and used as a practical architecture operating model rather than a theoretical compliance exercise.
TOGAF in the Cloud and Modern Infrastructure Era
Some people assume enterprise architecture frameworks are less relevant in fast-moving cloud environments, but the opposite is often true. Hybrid and multi-cloud strategies introduce complexity across governance, security, platform design, application placement, integration, cost management, and operational consistency.
TOGAF helps organizations define target-state architecture, clarify principles, standardize delivery patterns, and build realistic migration roadmaps. For cloud architects and infrastructure leaders, it can serve as a useful bridge between strategic planning and technical execution.
Who Should Learn TOGAF?
TOGAF is commonly associated with enterprise architects, but its value goes beyond that role. Solution architects, cloud architects, technical leaders, digital transformation managers, platform strategists, and IT decision-makers can all benefit from understanding the framework.
It is especially useful for professionals who operate between business strategy and technical implementation and need a more structured way to frame architecture decisions.
Final Thoughts
TOGAF remains one of the most influential enterprise architecture frameworks because it provides a disciplined way to connect strategy, architecture, governance, and transformation planning. It helps organizations look beyond individual projects and instead design technology environments that support the enterprise as a whole.
Whether the goal is cloud adoption, infrastructure modernization, application rationalization, or enterprise-wide transformation, TOGAF offers a strong foundation for building a more intentional and aligned architecture practice.
Bottom Line
TOGAF is not just a framework for creating architecture documents. It is a structured way to guide enterprise change, align IT with business direction, and govern transformation more effectively.
Continue the Architecture Conversation
If you are exploring enterprise architecture, cloud strategy, infrastructure modernization, or governance frameworks, follow Daily Cloud Blog for more practical breakdowns focused on modern IT and enterprise transformation.
Read more articles, share this post with your architecture team, and stay connected for more enterprise IT insights.
-
NetApp at .NEXT 2026: A New Path to Modern Virtualization
Daily Cloud Blog • Allance Partnership • Infrastructure Stratergy
Nutanix & NetApp at .NEXT 2026: A New Path to Modern Virtualization
An article that will provide insights into Nutanix and NetApp’s latest innovations in virtualization.
Author
Daily Cloud Blog Editorial Team
Published
April 12, 2026
Read Time
5 min read
Nutanix and NetApp are teaming up to give enterprises a more flexible way to modernize virtualization, simplify operations, and bring powerful data services into Nutanix environments.
Christian Marrero | April 12, 2026 | 3–5 min readDaily Cloud Blog • Virtualization • Storage • Hybrid Cloud
AHV
ONTAP
NFS Integration
VM Migration
Cyber ResilienceNutanix used the .NEXT 2026 stage to announce a strategic alliance with NetApp, and this one stands out for a simple reason: it gives customers another serious option for modernizing virtual infrastructure without forcing an all-or-nothing redesign.
The partnership is built around integrating NetApp’s enterprise storage platform and ONTAP data services with the Nutanix Cloud Platform running AHV. In practical terms, that means organizations looking to evolve their virtualization stack can pair Nutanix compute and operations with NetApp storage and data management capabilities in a more connected way.
Why This Matters
A lot of enterprise teams are rethinking infrastructure right now. Rising virtualization costs, pressure to modernize faster, and the need to support both traditional VMs and newer cloud-native workloads are all pushing IT leaders to look for platforms that are simpler, more flexible, and easier to scale.
That is what makes this Nutanix–NetApp move interesting. Instead of treating storage and virtualization as separate conversations, the announcement positions them as part of the same modernization strategy. Nutanix brings the virtualization and hybrid multicloud control plane. NetApp brings mature data management, resilience, and storage services. Together, they are aiming to offer customers more choice without adding more complexity.
My take: this is less about a flashy partnership headline and more about giving enterprises a realistic path to modernize virtual environments while still protecting existing storage investments.
What the Joint Solution Is Trying to Deliver
Based on the announcement, the combined approach is focused on a few big outcomes:
- Modernized virtualization: a new path for organizations that want to refresh their hypervisor and platform strategy.
- Faster migration: NFS-based integration and tooling are expected to reduce friction when moving VMs into Nutanix environments.
- Simplified operations: less administrative overhead across infrastructure and storage teams.
- VM-granular control: more precise visibility and management at the virtual machine level.
- Built-in cyber resilience: stronger protection through NetApp’s ransomware and data resilience capabilities.
That combination could be especially appealing to organizations trying to move quickly but still keep enterprise-grade storage features in the design.
A Bigger Strategic Signal
There is also a broader message behind this announcement. Nutanix is clearly continuing to expand its ecosystem around the idea of customer choice. NetApp, on the other side, is extending its role deeper into virtualization modernization conversations instead of staying boxed into traditional storage-only positioning.
That makes this partnership bigger than just product integration. It reflects where the market is going: customers want infrastructure stacks that let them modernize on their own timeline, preserve existing investments where it makes sense, and stay ready for cloud-native and AI-driven use cases without rebuilding everything from scratch.
Looking Ahead
One of the more interesting forward-looking notes in the announcement is the plan to connect NetApp ONTAP into Nutanix’s Agentic AI direction over time. That suggests this alliance is not just about today’s virtualization problems. It is also about building a data and infrastructure foundation that can support what comes next.
If Nutanix and NetApp execute well here, this could become a strong option for enterprises that want a simpler modernization path, better operational separation between compute and storage, and a cleaner runway into future hybrid cloud and AI architectures.
Key Takeaways
- Nutanix and NetApp announced a strategic alliance at .NEXT 2026.
- The integration is designed to pair Nutanix Cloud Platform and AHV with NetApp ONTAP-based storage.
- Main themes include modernization, migration speed, operational simplicity, VM-level control, and cyber resilience.
- The partnership also hints at future AI-oriented integration opportunities.
Final Thoughts
For teams looking to modernize virtualization without losing the benefits of mature enterprise storage and data management, this Nutanix–NetApp announcement is worth watching closely.
Follow Daily Cloud Blog for more practical breakdowns on Nutanix, hybrid cloud, infrastructure modernization, and enterprise platform strategy.
Stay Connected with Daily Cloud Blog
If you found this comparison helpful, follow Daily Cloud Blog for more practical content on cloud, virtualization, DevOps, cybersecurity, and infrastructure strategy.
We regularly share technical breakdowns, architecture guidance, and real-world insights designed for engineers, architects, and IT leaders.
Want more posts like this? Subscribe for fresh content on AWS, Azure, Kubernetes, virtualization, and modern infrastructure trends.
About Daily Cloud Blog
Daily Cloud Blog shares practical insights on cloud, virtualization, infrastructure, and modern IT strategy for engineers, architects, and technology leaders.
-
Nutanix + Pure Storage Partnership
Daily Cloud Blog • Infrastructure • Virtualization • Storage
Nutanix + Pure Storage: A Technical Deep Dive into the Modern Virtualization Stack
How AHV + FlashArray + NVMe/TCP delivers disaggregated performance, simplified operations, and resilient enterprise infrastructure.
AHV
FlashArray
NVMe/TCP
Disaggregated HCI
Day-2 OpsEnterprises are rethinking virtualization stacks as they modernize data centers, migrate from legacy licensing models, and prepare for AI-ready workloads.
The partnership between Nutanix and Pure Storage targets a simple goal: deliver a modern, scalable platform that pairs
Nutanix AHV and the Nutanix control plane with Pure Storage FlashArray — connected using NVMe over TCP
on standard Ethernet.In this post, we’ll break down what’s actually happening in the architecture, why NVMe/TCP is a big deal, and where this design fits best
(and where it doesn’t).TL;DR (For Architects)
- Compute/Virtualization: Nutanix Cloud Platform running AHV
- Storage: Pure Storage FlashArray presented as external storage
- Transport: NVMe/TCP over 25/40/100GbE (standard IP networking)
- Operations: Unified workflows via Prism (less tool sprawl)
- Outcome: Disaggregated scale + enterprise performance + simplified day-2 ops
1) Architecture Overview
The solution combines Nutanix’s virtualization and management plane with Pure’s all-flash array performance. Instead of forcing storage and compute to
scale together, you can scale each independently while still keeping a consistent operations model.+---------------------------+ +---------------------------+ | Nutanix Cluster (AHV) | NVMe/TCP IP | Pure Storage FlashArray| |---------------------------||---------------------------| | - AHV Hosts (Compute) | 25/40/100GbE | - All-Flash Volumes | | - Prism (Mgmt + Ops) | | - Snapshots/Immutability | | - VM Services/HA/DR | | - Data Reduction/Encrypt | +---------------------------+ +---------------------------+
From the host perspective, FlashArray volumes are presented as external storage, enabling high-performance VM datastores while preserving
Nutanix’s operational model for provisioning, monitoring, and lifecycle tasks.2) Why NVMe/TCP Changes the Conversation
The choice of NVMe over TCP is more than a checkbox — it’s a modernization of the storage IO path. NVMe was designed around parallelism
and high queue depth, which is exactly what virtualized environments and modern apps tend to generate.Performance Profile
- Lower latency under load
- High throughput for mixed workloads
- Better scaling with parallel queues
Operational Simplicity
- Runs on Ethernet (no FC required)
- IP-based, cloud-aligned networking
- Clean automation workflows
Design Considerations
- Dedicated storage VLAN(s)
- Jumbo frames (where supported)
- Redundant paths / ToR uplinks
3) Operational Model: Prism + FlashArray
A common pain point in “compute + external array” architectures is management fragmentation. The Nutanix–Pure partnership focuses on
streamlining day-2 ops by integrating common storage workflows into Nutanix’s management experience.Practical outcome: platform teams spend less time jumping between consoles and more time automating repeatable workflows
(provision → protect → monitor → scale).What to Validate in a PoC
- Provisioning speed and workflow consistency in Prism
- IO performance under mixed VM workloads (read/write, random/sequential)
- Snapshot behavior and recovery time for large datastores
- Multipathing and failure testing (ToR failure, link failure, controller failover)
4) Disaggregated Scale: Where This Fits Best
Not every workload needs disaggregated storage, but some environments absolutely benefit from it — especially where storage growth
outpaces compute or where predictable performance is mandatory.Strong Fit Use Cases
- Storage-heavy enterprise apps (databases, ERP, VDI profiles, analytics)
- Environments migrating off legacy hypervisors with SAN-aligned designs
- Workloads needing enterprise snapshot/immutability for ransomware recovery
- Teams standardizing on AHV while keeping external array performance
When to Think Twice
- Small footprints where HCI simplicity wins and storage doesn’t outgrow compute
- Networks that can’t support low-latency east/west storage traffic cleanly
- Use cases that require a very specific array feature not in your baseline design
5) Resilience and Security: Defense in Depth
The platform’s resilience story benefits from layering capabilities across virtualization and storage.
Nutanix delivers VM-level availability, orchestration, and segmentation, while Pure Storage strengthens data protection with
immutable snapshots and rapid restore workflows.Virtualization Layer
- HA / Live migration
- DR orchestration options
- Microsegmentation (east/west control)
Storage Layer
- Immutable snapshots (ransomware defense)
- Encryption and rapid recovery
- Consistent performance under load
Final Take
The Nutanix + Pure Storage partnership is a strong move toward modern disaggregated infrastructure:
Nutanix AHV provides the virtualization and platform experience, Pure Storage FlashArray provides enterprise all-flash performance and protection,
and NVMe/TCP delivers a clean, scalable transport over standard IP networks.Daily Cloud Blog — Suggested Next Content
- PoC checklist: AHV + FlashArray NVMe/TCP validation steps
- Reference design: VLANs, MTU, ToR redundancy, multipathing, and failure testing
- Migration path: VMware → AHV with external storage (risk and cutover patterns)
Disclaimer: This article is for educational purposes and reflects a technical interpretation of publicly available information.
Always validate compatibility, performance, and supportability with official vendor documentation before production deployment. -
Nutanix & Pure Storage: A Smarter Way to Build Modern Infrastructure
Enterprise infrastructure is changing fast. Between cloud adoption, data growth, and new workload demands, a lot of IT teams are realizing that
traditional stacks just aren’t cutting it anymore. Siloed platforms, complex integrations, and pricey licensing models can slow teams down when they’re trying to move faster.That’s where the Nutanix and Pure Storage partnership comes in. The idea is pretty straightforward: pair
Nutanix’s virtualization and management experience (including AHV) with Pure’s high-performance FlashArray storage—
and keep the whole thing clean, scalable, and easier to operate.Quick takeaway
- Nutanix: AHV + Prism = simplified compute/virtualization + unified ops
- Pure Storage: FlashArray = fast, resilient, enterprise all-flash storage
- Together: modern stack with less tool sprawl, strong performance, and room to scale
Why this partnership actually makes sense
At a high level, it’s about playing to each company’s strengths. Nutanix brings the cloud-native platform experience—especially around
virtualization, operations, and lifecycle management—while Pure brings the storage horsepower and data protection that enterprise teams depend on.What you get with the integrated solution
1) Storage and virtualization that actually work together
The old way was “bolt storage to virtualization,” then manage everything in different tools. This integration reduces that friction.
With Nutanix Prism managing workflows alongside Pure FlashArray resources, teams spend less time context-switching and more time operating the platform.2) Built on modern storage protocols (NVMe over TCP)
Instead of leaning on older storage protocols, this solution supports NVMe/TCP. Translation: fast storage performance over standard IP networking.
That’s a good match for modern data center designs—and it scales well for demanding workloads.- Low latency and high throughput
- Scalable bandwidth for busy environments
- Future-friendly approach for hybrid cloud and data-heavy workloads
3) More flexibility (without the mess)
This doesn’t replace Nutanix HCI—it expands your options. You can still run full HCI where it makes sense, but now you can also scale storage independently
with FlashArray when storage growth outpaces compute. That helps teams design around workloads instead of forcing everything into one fixed model.4) Built-in resilience and security
Both platforms bring strong security and resilience features. Nutanix provides virtualization-layer controls (like segmentation and DR workflows),
while Pure adds encryption and immutable snapshot options that help protect against ransomware and “oops” moments.The bigger shift: real enterprise choice
The bigger story here is choice. IT teams want flexibility and simplicity without giving up performance.
A partnership like this gives organizations a practical path to modernize without rebuilding everything from scratch.- Unified virtualization + management experience
- High-performance storage integrated cleanly into operations
- Smoother day-0 through day-2 workflows
- Architectural flexibility as workloads evolve (including AI/data-heavy use cases)
Looking ahead
As infrastructure keeps evolving, the Nutanix–Pure partnership puts both companies in a solid position: it challenges legacy lock-in and gives customers
a modern, scalable alternative for enterprise workloads. If you’re modernizing virtualization or planning for hybrid and AI-ready infrastructure,
this is one worth keeping on your radar.Daily Cloud Blog • Next up
- PoC checklist: what to validate with AHV + FlashArray + NVMe/TCP
- Reference design: VLANs, MTU, redundancy, and failure testing
- Migration notes: common patterns for moving from legacy hypervisors
-
AWS PrivateLink: What It Is and the Gotchas You Should Know

Daily Cloud Blog • Virtualization • Infrastructure Strategy
AWS PrivateLink: What It Is and the Gotchas You Should Know
An article that will provide insights into AWS PrivateLink and the common pitfalls to avoid.
Author
Daily Cloud Blog Editorial Team
Published
April 2, 2026
Read Time
10 min read
If you’re building secure architectures in AWS, sooner or later you’ll encounter AWS PrivateLink. It’s one of the most powerful — and sometimes misunderstood — networking features in AWS. PrivateLink allows you to connect privately to services without exposing traffic to the public internet, which is critical for security, compliance, and enterprise architectures.
However, while the concept sounds simple, there are several design considerations and configuration gotchas that architects often discover the hard way.
In this post we’ll cover:
- What AWS PrivateLink is
- When to use it
- How it works architecturally
- Common configuration mistakes and gotchas
What is AWS PrivateLink?

AWS PrivateLink allows you to privately access services hosted in another VPC, AWS service, or partner service through interface endpoints.
Instead of routing traffic through:
- Internet Gateway
- NAT Gateway
- VPN
- Direct Connect public endpoints
PrivateLink allows communication entirely within the AWS network.
In short:
PrivateLink provides private connectivity to services using private IP addresses inside your VPC.
How AWS PrivateLink Works
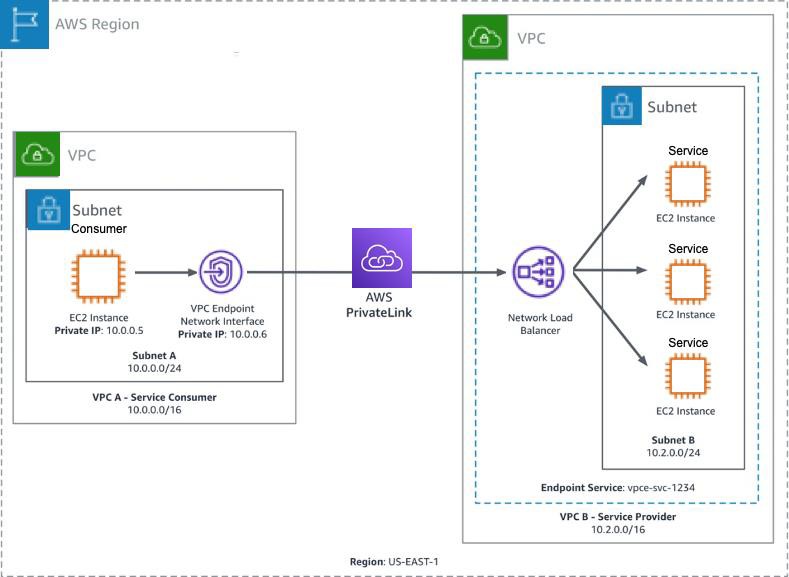
At a high level, PrivateLink connects service consumers and service providers.
Components
Service Provider
- Hosts the service
- Usually fronted by a Network Load Balancer (NLB)
- Creates an Endpoint Service
Service Consumer
- Creates an Interface VPC Endpoint
- Receives private ENIs in their subnets
- Connects to the service via private DNS
Traffic Flow
- Service provider exposes service behind Network Load Balancer
- Provider creates VPC Endpoint Service
- Consumer creates Interface Endpoint
- AWS creates Elastic Network Interfaces (ENIs) in consumer subnets
- Traffic flows privately inside AWS backbone
When Should You Use PrivateLink?
PrivateLink is ideal when you want secure service consumption without network-level connectivity.
Common use cases:
1️⃣ Access AWS Services Privately
Example:
- S3
- DynamoDB
- Secrets Manager
- KMS
Your workloads can access these services without a NAT gateway or internet access.
2️⃣ SaaS Providers
If you’re offering a SaaS platform:
PrivateLink allows customers to access your service without exposing public endpoints.
Example:
Customer VPC → PrivateLink → Your SaaS Platform
3️⃣ Cross-Account Service Sharing
Organizations often expose internal services across accounts using PrivateLink instead of:
- VPC Peering
- Transit Gateway
4️⃣ Highly Regulated Environments
Industries like:
- Government
- Finance
- Healthcare
often require no internet exposure, making PrivateLink ideal.
PrivateLink vs VPC Peering
Feature PrivateLink VPC Peering Connectivity Service-based Network-based CIDR overlap allowed Yes No Access granularity Single service Entire VPC Transitive routing No No Security exposure Minimal Larger PrivateLink is often preferred when you only want to expose a specific service.
Common AWS PrivateLink Gotchas
Even experienced cloud engineers run into these issues.
Let’s walk through the most common ones.
Gotcha #1 — Requires a Network Load Balancer
PrivateLink only supports Network Load Balancers for endpoint services.
This means:
❌ Application Load Balancer not supported
❌ Classic Load Balancer not supportedIf your service runs behind an ALB, you’ll need to place an NLB in front of it.
Typical workaround architecture:
NLB → ALB → Application
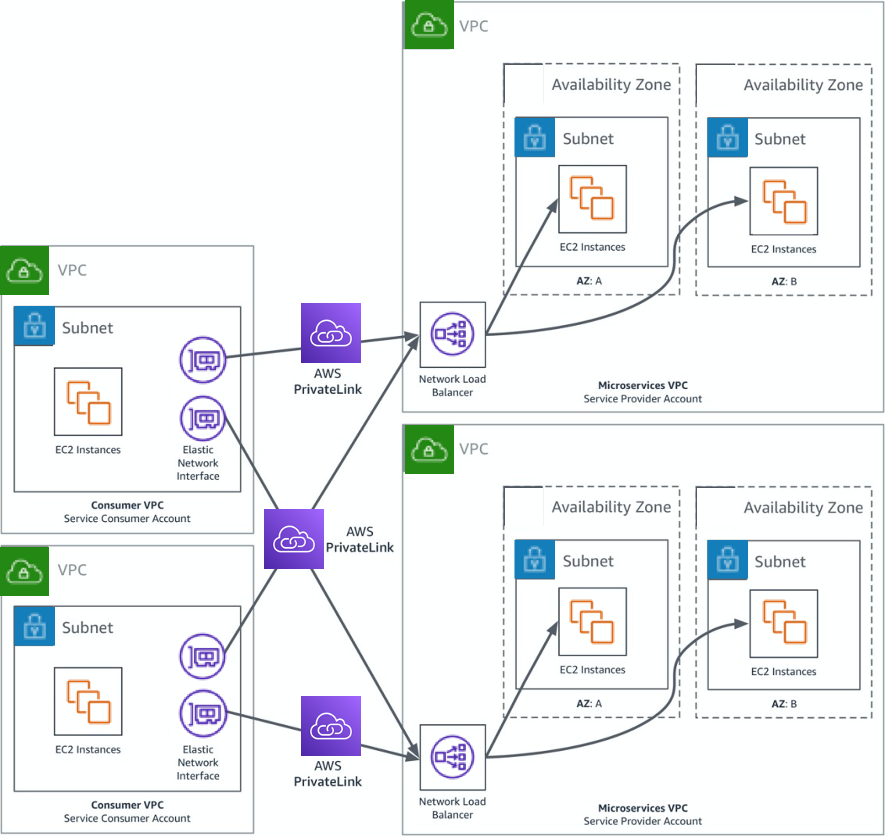
Gotcha #2 — One Endpoint Per AZ
Interface endpoints create Elastic Network Interfaces in each AZ.
If you deploy across 3 AZs:
3 Interface Endpoints
3 ENIsThis increases cost.
Gotcha #3 — It Can Get Expensive
PrivateLink pricing includes:
- Hourly endpoint cost
- Data processing cost
For high-throughput workloads, this can become more expensive than NAT Gateway or Transit Gateway.
Always estimate traffic costs before large deployments.
Gotcha #4 — DNS Can Be Tricky
Private DNS works only when enabled and supported by the service.
Common mistakes include:
- Forgetting to enable Private DNS
- Custom DNS servers not resolving AWS zones
- Split-horizon DNS conflicts
Example:
secretsmanager.us-east-1.amazonaws.comIf Private DNS is enabled, the request resolves to the private endpoint IP.
Gotcha #5 — Security Groups Matter
Interface endpoints support security groups.
If misconfigured:
- Traffic silently fails
- Connectivity appears broken
Typical required rules:
Inbound: Application port
Outbound: ephemeral return traffic
Gotcha #6 — Endpoint Policies Can Block Access
PrivateLink supports endpoint policies that restrict access.
Example policy:
{
“Statement”: [
{
“Effect”: “Allow”,
“Principal”: “*”,
“Action”: “s3:*”,
“Resource”: “*”
}
]
}If misconfigured, requests may be denied even when networking is correct.
Gotcha #7 — Cross-Account Acceptance Required
For custom services, the provider must accept endpoint connections.
Common troubleshooting issue:
Endpoint stuck in “Pending Acceptance”Provider must approve the request.
Gotcha #8 — Health Checks Can Break Connectivity
Since the service sits behind an NLB, NLB health checks must pass.
If health checks fail:
Endpoint = reachable
Service = unavailableAlways verify:
- Target group health
- Health check port
- Security groups
Architecture Example
Typical enterprise architecture using PrivateLink:
Account A (Service Provider)

---------------------------------

Application

│

Network Load Balancer

│

Endpoint ServiceAccount B (Consumer)

---------------------------------

VPC

│

Interface Endpoint

│

Application Servers
Best Practices
Use these best practices when deploying PrivateLink:
✔ Deploy endpoints in multiple AZs
✔ Enable private DNS when possible
✔ Monitor with VPC Flow Logs
✔ Estimate costs before deployment
✔ Use least-privilege endpoint policies
✔ Implement health checks carefully
Final Thoughts
AWS PrivateLink is an extremely powerful tool for building secure, service-oriented architectures in AWS.
It allows organizations to:
- Eliminate internet exposure
- Provide SaaS services securely
- Simplify cross-account access
- Meet strict compliance requirements
However, the networking and DNS components can introduce unexpected operational complexity, so careful design and testing are critical.
Stay Connected with Daily Cloud Blog
If you found this comparison helpful, follow Daily Cloud Blog for more practical content on cloud, virtualization, DevOps, cybersecurity, and infrastructure strategy.
We regularly share technical breakdowns, architecture guidance, and real-world insights designed for engineers, architects, and IT leaders.
Want more posts like this? Subscribe for fresh content on AWS, Azure, Kubernetes, virtualization, and modern infrastructure trends.
About Daily Cloud Blog
Daily Cloud Blog shares practical insights on cloud, virtualization, infrastructure, and modern IT strategy for engineers, architects, and technology leaders.
-
OpenShift Virtualization and Proxmox VE: Key Differences Explained
Daily Cloud Blog • Virtualization • Infrastructure Strategy
OpenShift Virtualization vs Proxmox VE
A practical breakdown of how these two platforms differ, where each one fits best, and what IT teams should consider before choosing a direction.
Author
Daily Cloud Blog Editorial Team
Published
March 6, 2026
Read Time
7 min read
Quick Summary: OpenShift Virtualization is best for organizations building around Kubernetes and cloud-native operations, while Proxmox VE is better suited for teams that want a simpler, cost-effective, traditional virtualization platform.As organizations modernize their infrastructure, virtualization platforms are evolving beyond traditional hypervisors. Two technologies often compared in modern environments are OpenShift Virtualization and Proxmox VE (Proxmox Virtual Environment).
While both platforms allow organizations to run virtual machines, they are built with different architectural philosophies and operational goals.
Understanding these differences helps IT teams choose the right platform depending on whether they are prioritizing cloud-native workloads, container integration, simplicity, scalability, or cost efficiency.
What is OpenShift Virtualization?
OpenShift Virtualization is a virtualization capability built into the Kubernetes-based OpenShift platform using the KubeVirt project.
Instead of running virtual machines on a traditional hypervisor stack alone, OpenShift Virtualization allows organizations to run VMs as Kubernetes-managed resources alongside containers.
Key Characteristics
1. Kubernetes-Native Virtual Machines
VMs run inside Kubernetes clusters, which makes it possible to manage both virtual machines and containerized workloads together in a unified platform.
2. Hybrid VM + Container Platform
Organizations can use OpenShift Virtualization to support:
- Containerized applications
- Traditional virtual machines
- Hybrid modernization strategies
3. Strong Cloud-Native Integration
It fits naturally into modern platform operations such as:
- CI/CD pipelines
- GitOps workflows
- Infrastructure automation
- Kubernetes-native networking and storage
4. Enterprise-Oriented Platform
OpenShift Virtualization is often aimed at enterprises building standardized platforms for hybrid cloud, multi-cluster operations, and modern application delivery.
Typical Use Cases
- Modernizing legacy workloads
- Running VMs and containers on one platform
- Gradually migrating traditional apps toward Kubernetes
- Enterprise platform engineering initiatives
What is Proxmox VE?
Proxmox Virtual Environment (VE) is an open-source virtualization platform built on:
- KVM for virtual machines
- LXC for lightweight containers
Proxmox follows a more traditional hypervisor model, similar in concept to VMware-style virtualization, while also offering an integrated management experience with clustering, storage, backups, and high availability features.
Key Characteristics
1. Traditional Virtualization Architecture
Proxmox runs directly on bare metal servers and uses KVM to host virtual machines in a familiar hypervisor-based design.
2. Built-In Web Management
Proxmox includes a clean web interface for common operational tasks such as:
- VM provisioning and management
- Storage configuration
- Cluster administration
- Backup and restore operations
3. Cost-Effective and Lightweight
One of Proxmox’s biggest strengths is that it offers strong virtualization capabilities without the licensing costs many teams associate with legacy enterprise virtualization platforms.
4. Practical Infrastructure Features
Proxmox includes features such as:
- Live migration
- High availability clustering
- Integrated backups
- Ceph support for software-defined storage
Typical Use Cases
- Traditional VM infrastructure
- Home labs and test environments
- Small and mid-sized business deployments
- Cost-conscious VMware alternative projects
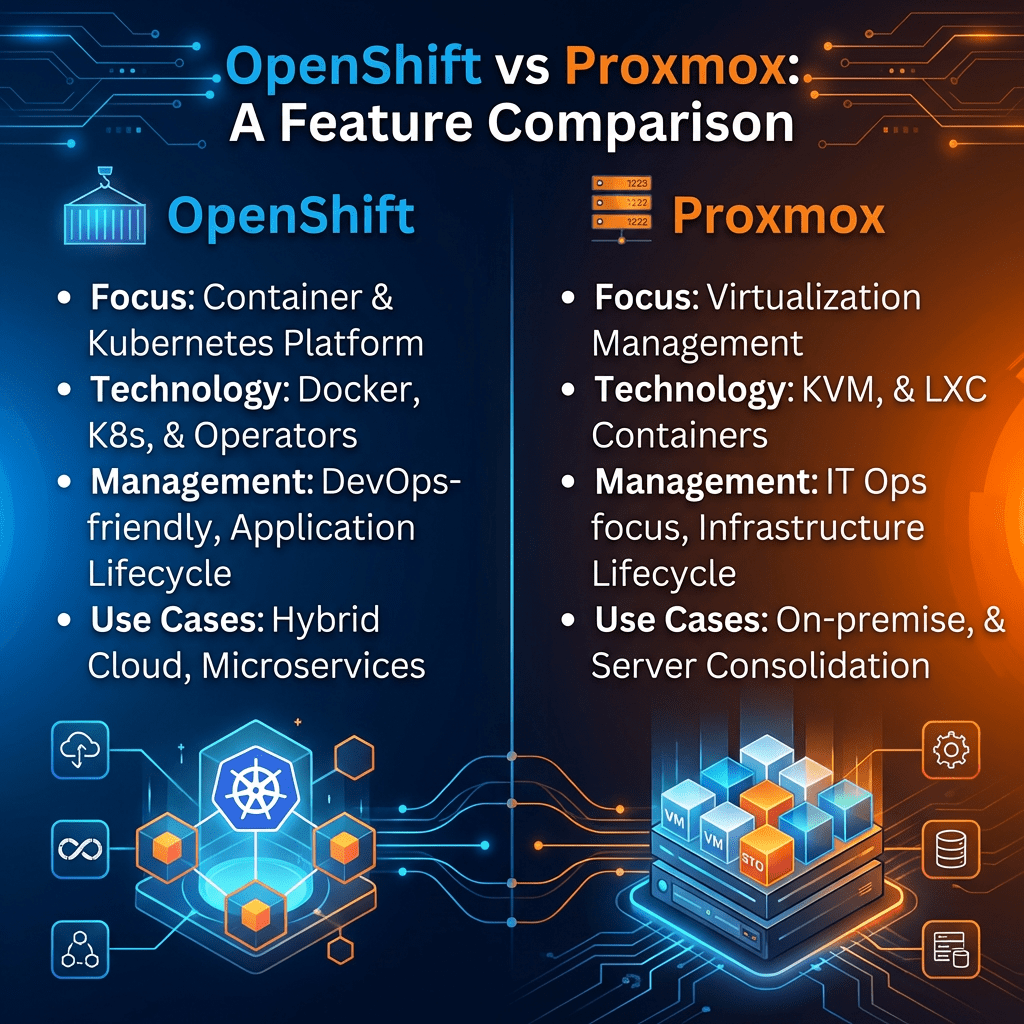
OpenShift Virtualization vs Proxmox: Key Differences
Feature OpenShift Virtualization Proxmox VE Core Platform Kubernetes-based platform Traditional hypervisor platform VM Technology KubeVirt KVM Container Approach Native Kubernetes containers LXC containers Best Fit Cloud-native and hybrid modernization Traditional VM hosting and lab environments Operational Complexity Higher due to Kubernetes ecosystem Lower and easier to adopt Automation Style GitOps, CI/CD, platform automation Traditional admin workflows and API-based automation Cost Model Enterprise subscription model Open-source with optional support subscription Architecture Comparison
OpenShift Virtualization Architecture
Applications
   │
Containers + Virtual Machines
   │
OpenShift / Kubernetes
   │
KubeVirt Virtualization Layer
   │
Worker Nodes
   │
Bare Metal Infrastructure
Proxmox VE Architecture
Applications
   │
Virtual Machines / LXC Containers
   │
Proxmox Management Layer
   │
KVM Hypervisor
   │
Linux OS
   │
Bare Metal Infrastructure
When Should You Use OpenShift Virtualization?
OpenShift Virtualization makes the most sense when your organization is:
- Building a cloud-native platform strategy
- Running both containers and VMs together
- Standardizing around Kubernetes
- Adopting DevOps and GitOps workflows at scale
It is especially valuable when infrastructure teams are trying to reduce platform sprawl and unify operations around a modern application platform.
When Should You Use Proxmox?
Proxmox is a strong choice when you want:
- A simpler virtualization platform
- A cost-effective VMware alternative
- A traditional VM-first operating model
- A fast and practical deployment for labs or production
For organizations that do not need deep Kubernetes integration, Proxmox often delivers excellent value with less complexity.
Final Thoughts
Both OpenShift Virtualization and Proxmox are capable platforms, but they solve different problems.
OpenShift Virtualization is about bringing virtual machines into a broader Kubernetes and cloud-native operating model.
Proxmox VE is about delivering dependable, flexible, and affordable virtualization in a more traditional way.
The better choice depends less on feature checklists and more on your operational direction. If your team is moving toward platform engineering, GitOps, and container-first operations, OpenShift Virtualization may be the better long-term fit. If your team mainly needs efficient VM hosting with straightforward management, Proxmox may be the better answer.
Key Takeaway
Choose OpenShift Virtualization if you are building around Kubernetes, automation, and cloud-native modernization.
Choose Proxmox VE if you want a simple, powerful, and budget-friendly virtualization platform for traditional VM workloads.
Stay Connected with Daily Cloud Blog
If you found this comparison helpful, follow Daily Cloud Blog for more practical content on cloud, virtualization, DevOps, cybersecurity, and infrastructure strategy.
We regularly share technical breakdowns, architecture guidance, and real-world insights designed for engineers, architects, and IT leaders.
Want more posts like this? Subscribe for fresh content on AWS, Azure, Kubernetes, virtualization, and modern infrastructure trends.
About Daily Cloud Blog
Daily Cloud Blog shares practical insights on cloud, virtualization, infrastructure, and modern IT strategy for engineers, architects, and technology leaders.
-
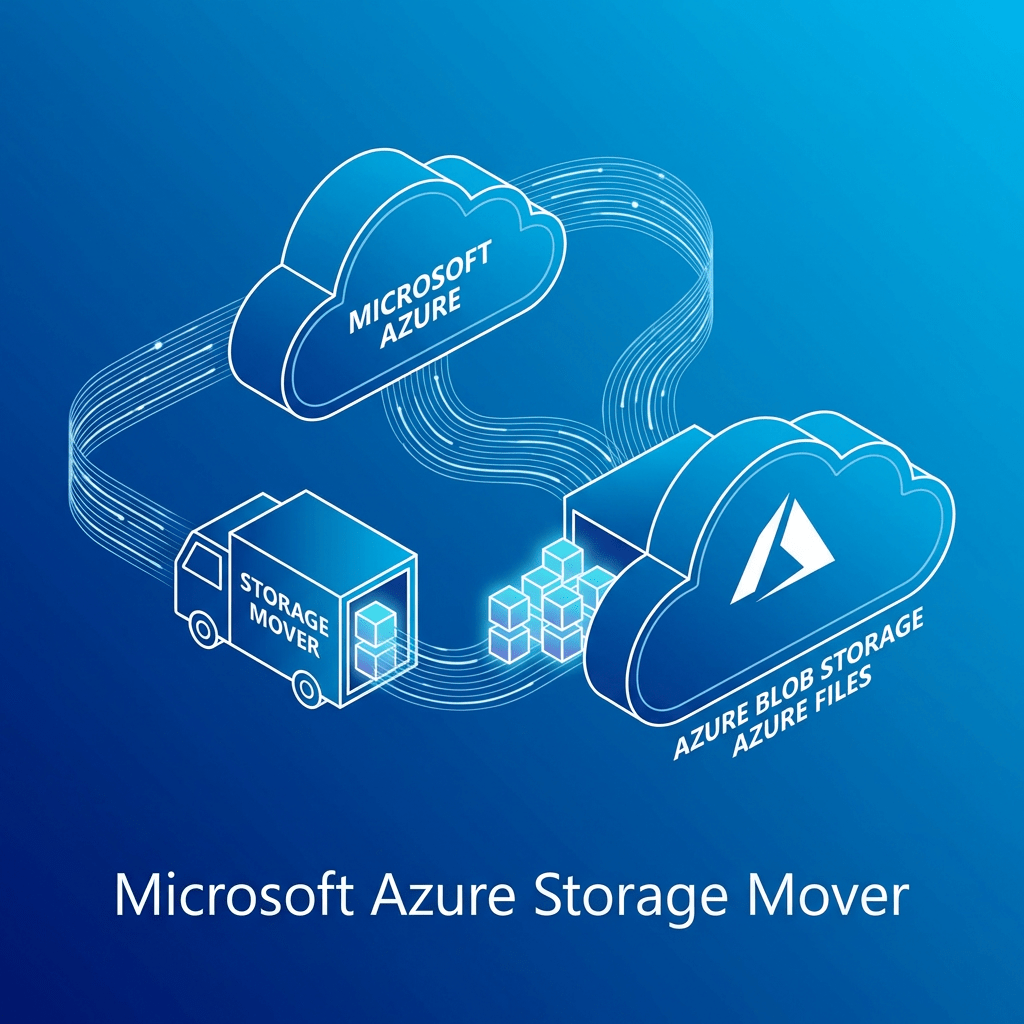
Azure Storage Mover for Cloud-to-Cloud Migration: A Real-World Infrastructure Perspective
 Daily Cloud Blog
Azure Storage Mover for Cloud-to-Cloud Migration: A Real-World Infrastructure Perspective
A practical look at the technology behind Azure Storage Mover, Azure Arc multicloud connectors, Amazon S3 to Azure Blob migrations, and what matters when you’re planning this in an enterprise environment.
Author: Christian MarreroCategory: Azure / Cloud Migration / StorageFor: MB Technology Group LLCIn real-world cloud architecture, migrations are rarely just about “moving files.” They are about identity, connectivity, governance, performance, cost control, and making sure the destination platform is ready to support the business once the data lands.
Looking at Microsoft’s approach with Azure Storage Mover cloud-to-cloud migration, what stands out to me is that it is not just a transfer utility. It is a more structured platform workflow that ties together Azure Storage Mover, Azure Arc multicloud connectors for AWS, Amazon S3, and Azure Blob Storage into a managed migration pattern.
From my experience working across infrastructure, cloud platforms, storage, and enterprise migration initiatives, that is the right way to think about this service: not as a simple copy job, but as part of a broader multicloud data movement architecture.
What Azure Storage Mover Is Really Doing
Microsoft’s documented workflow for this scenario focuses on securely migrating data from Amazon S3 to Azure Blob Storage. The design depends on Azure Arc multicloud connectors for AWS to simplify authentication and resource management for resources that live outside Azure. In practice, that means Azure is establishing controlled visibility into the AWS-side storage resources before you define endpoints and run migration jobs. :contentReference[oaicite:1]{index=1}
Architecturally, I like this approach because it introduces a more enterprise-friendly control plane. Instead of treating AWS as a disconnected external source, Azure brings it into a governance-aware model using Arc integration. That matters when you’re dealing with production datasets, audit expectations, and repeatable migration workflows.
Core Technologies Used in This Migration Pattern
1. Azure Storage Mover
This is the orchestrator for the migration workflow. It is the Azure-native service that defines and runs the movement of data between source and destination endpoints. In a real environment, this becomes the operational layer where teams manage jobs, endpoints, and transfer activity.
2. Azure Arc Multicloud Connector for AWS
This is one of the most important pieces of the whole design. Microsoft’s process requires creating a multicloud connector for AWS, adding an Inventory solution first, and then adding the Storage – Data Management solution. That sequence is important because it reflects how Azure first discovers and manages the AWS-side resources before using them for migration operations. :contentReference[oaicite:2]{index=2}
3. Amazon S3 as the Source
On the source side, this pattern is built specifically for Amazon S3 buckets. That makes sense for organizations exiting or reducing dependency on AWS storage tiers, consolidating data into Azure analytics ecosystems, or supporting Azure-centric application modernization.
4. Azure Blob Storage as the Target
The destination is Azure Blob Storage, configured as a target endpoint in the Storage Mover workflow. For many enterprises, that destination is not just a landing zone — it is the front door to downstream data services, analytics platforms, archive strategies, and application integrations.
Why This Technology Stack Makes Sense from an Enterprise Perspective
From an engineering standpoint, this is the kind of design I appreciate because it separates the migration into clean layers:
- Control plane: Azure Storage Mover + Azure Arc
- Source platform: Amazon S3
- Destination platform: Azure Blob Storage
- Execution model: defined source/target endpoints and migration jobs
That separation is useful because enterprise migrations usually fail when everything is handled as one giant opaque process. When the platform forces you to define connectors, endpoints, permissions, and workflows separately, it becomes easier to troubleshoot, secure, and operationalize.
In my experience, that kind of structure is especially valuable in hybrid and multicloud environments where different teams own AWS, Azure, networking, identity, and storage operations. A service like this gives you a repeatable way to coordinate those responsibilities.
Security Considerations I Would Focus On
Security is where this migration pattern becomes more than just a technical convenience. Microsoft notes that the cloud-to-cloud feature securely transfers data by limiting S3 access to trusted Azure IP ranges over the public internet, while also noting that private networking is not currently supported.
For me, that immediately tells you what to validate before production use:
- Tight AWS-side permissions and limited connector scope
- Review of which AWS regions and services are included in discovery
- Strong Azure RBAC for Storage Mover and Arc resources
- Storage account hardening on the Azure side
- Logging, monitoring, and activity tracking across both clouds
- Data classification review before migration begins
Important Operational Realities
Microsoft also documents several limits that are worth calling out early in project planning:
- Each migration job supports up to 500 million objects
- A maximum of 10 concurrent jobs per subscription is supported by default
- Objects in AWS Glacier or Deep Archive must be restored before migration
- Automatic rehydration of archived objects is not supported
- Private networking is not currently supported for this feature
These are the kinds of details that matter in enterprise planning. If you are moving a large-scale dataset, especially one that has mixed storage classes, you need to model the job sequencing, restoration timelines, and operational windows before anyone clicks “Start migration.” :contentReference[oaicite:4]{index=4}
How I’d Frame the Implementation in a Real Project
Based on the workflow Microsoft documents, the practical implementation path looks like this:
- Deploy the Azure Storage Mover resource
- Create the Azure Arc multicloud connector for AWS
- Add the required Inventory solution first, then Storage – Data Management
- Use the provided authentication template workflow to establish the AWS-side configuration
- Create the AWS S3 source endpoint
- Create the Azure Blob target endpoint
- Build and execute the migration job
I like this pattern because it is clear, staged, and easy to map to change control. It is also compatible with how enterprise teams actually operate: validate connectivity, confirm permissions, scope source data, prepare the target landing zone, and only then begin moving data. Microsoft’s article also provides Azure portal, PowerShell, and Azure CLI options for endpoint creation, which is useful depending on whether your team prefers GUI administration or automation-driven deployment. :contentReference[oaicite:5]{index=5}
Business Benefits Beyond the Migration Itself
The obvious value is the ability to move data from AWS to Azure. But the bigger business value is what this enables afterward:
- Consolidation into Azure-native storage and analytics services
- Reduced operational complexity when standardizing around Azure
- Improved governance visibility through Azure-managed workflows
- Cleaner alignment with modernization, archive, or AI/data platform strategies
- More repeatable migration operations for future waves
In other words, the service matters not just because it copies data, but because it can serve as part of a broader platform transition strategy.
My Take
From my perspective, Azure Storage Mover’s cloud-to-cloud capability is most valuable when used as part of a disciplined multicloud migration plan. The technology stack behind it — Azure Storage Mover, Azure Arc for AWS, Amazon S3, and Azure Blob Storage — shows that Microsoft is thinking beyond simple transfer tools and moving toward a more governed migration framework.
For cloud and infrastructure teams, that is the real story here. The service is not just about moving objects from point A to point B. It is about creating a managed, secure, and operationally clean path for cross-cloud data migration.
Final Thought
If your organization is evaluating how to move data from AWS into Azure in a way that is more structured than ad hoc scripts and manual copy jobs, Azure Storage Mover is worth a serious look.
Follow Daily Cloud Blog for more practical infrastructure, cloud migration, Azure, AWS, and enterprise architecture content.
-
Nutanix NCI 7.3 — What’s New in the Latest Release
 DAILY CLOUD BLOG · NUTANIX · HYBRID CLOUD
Nutanix NCI 7.3 — What’s New in the Latest Release
Nutanix Cloud Infrastructure 7.3 brings meaningful platform improvements across multicluster operations, disaster recovery, networking, automation, and security—helping enterprises run hybrid cloud environments with more consistency and less operational friction.
AuthorDaily Cloud BlogCategoryHybrid Cloud / Infrastructure / NutanixPublished2026Introduction
As hybrid multicloud environments continue to mature, platform updates are increasingly judged by one thing: whether they make real-world operations easier. Nutanix Cloud Infrastructure (NCI) 7.3 is one of those releases that focuses less on flashy marketing features and more on the practical improvements infrastructure teams actually care about.
From multicluster lifecycle management to disaster recovery orchestration, networking enhancements, and security hardening, NCI 7.3 adds meaningful value for organizations looking to simplify infrastructure while improving scale and resilience.
Why this release matters
NCI 7.3 is important because it strengthens the operational foundation of Nutanix environments—especially for enterprises running multiple clusters, planning for disaster recovery, or building a more flexible hybrid cloud strategy.
What is Nutanix NCI?
Nutanix NCI is the company’s core infrastructure platform, bringing together compute, storage, virtualization, and networking into a unified software-defined stack. It is designed to help organizations reduce infrastructure complexity while supporting workloads across datacenters, edge locations, and cloud-connected environments.
What’s New in Nutanix NCI 7.3
1. Stronger Multicluster Management

One of the most useful improvements in NCI 7.3 is the continued evolution of centralized multicluster operations. For organizations managing distributed environments, reducing administrative overhead is a major win.
- More centralized lifecycle management capabilities
- Better consistency for upgrades across clusters
- Improved operational control through Prism Central
This is particularly valuable for enterprises operating across multiple sites, business units, or hybrid cloud footprints.
2. Enhanced Disaster Recovery and Resilience
Business continuity remains a major priority for modern infrastructure teams, and NCI 7.3 pushes further in the area of disaster recovery readiness.
- Improved recovery flexibility for varying workload needs
- Better scaling support in flash-based environments
- Refinements in DR orchestration across clusters
These improvements help simplify recovery planning while improving confidence in failover and resilience strategies.
3. Networking and Workload Mobility Improvements
Networking enhancements in NCI 7.3 are aimed at helping infrastructure teams support more flexible workload placement and movement.
- Advancements for AHV multicluster virtual switching
- Better IP address management capabilities
- Smoother workload mobility across cluster boundaries
For hybrid cloud strategies, this is a meaningful step toward more portable and manageable application infrastructure.
4. Security and Encryption Enhancements
Security remains a core requirement in enterprise infrastructure, and NCI 7.3 introduces improvements that support a more hardened platform posture.
- Stronger encryption-related protections
- Improved access control and credential-related safeguards
- Additional security-focused operational refinements
These updates help organizations support compliance goals while reducing operational risk.
5. Smarter Automation and VM Operations
Automation is another area where NCI 7.3 adds practical improvements, particularly for larger environments that need repeatable and policy-driven deployment patterns.
- Better VM template placement intelligence
- Faster provisioning workflows for common deployment scenarios
- Reduced manual intervention for cluster-level decisions
This can make a real difference in VDI, EUC, test/dev, and standardized enterprise deployment pipelines.
6. Performance, Scale, and Stability Gains
Not every important enhancement gets a flashy headline. NCI 7.3 also brings valuable improvements in the areas of performance tuning, ecosystem integration, and platform stability.
- Scalability improvements for demanding environments
- API enhancements for integrations and automation
- General reliability and operational stability refinements
For production workloads, these are often the enhancements that matter the most over time.
Quick View: Focus and Operational Benefits
Quick View: Where NCI 7.3 Delivers Value
Area What’s Improved Why It Matters Multicluster Ops Centralized management and lifecycle consistency Simplifies operations across distributed environments Disaster Recovery Better orchestration and resilience support Improves recovery readiness and business continuity Networking Mobility and IP/network control enhancements Supports more flexible hybrid cloud operations Security Stronger hardening and encryption-focused updates Helps reduce risk and improve security posture Automation Improved provisioning and policy-driven operations Reduces manual work and improves deployment consistency Bottom line
Nutanix NCI 7.3 is a solid enterprise release that focuses on operational improvements where they matter most: management, resilience, workload mobility, automation, and platform hardening. For infrastructure teams, that means fewer friction points and a better foundation for modern hybrid cloud environments.
Final Thoughts
Nutanix NCI 7.3 may not be the loudest release, but it is one of the more practical ones. It reinforces the core strengths of the platform while improving the day-to-day experience of operating infrastructure at scale.
If your organization is focused on hybrid cloud maturity, multisite infrastructure operations, DR readiness, or simplified virtualization management, this is the kind of release worth understanding closely.
Stay Connected with Daily Cloud Blog
Follow Daily Cloud Blog for more hands-on content covering Nutanix, AWS, Azure, virtualization, infrastructure modernization, and hybrid cloud strategy.
Share this post with your team, use it in your LinkedIn content flow, and keep an eye out for deeper technical write-ups focused on architecture, deployment, and operational best practices.
-
Understanding AWS Interface Endpoints

AWS Interface Endpoints Explained
How AWS PrivateLink Enables Private Connectivity to AWS Services
Author: Christian Marrero | Daily Cloud BlogPublished: March 2026
As organizations continue moving workloads to the cloud, one of the biggest security concerns is controlling how applications communicate with external services.
Many teams assume that accessing AWS APIs requires sending traffic over the public internet. Fortunately, AWS provides a powerful feature that eliminates this requirement entirely: Interface Endpoints.Interface Endpoints allow resources within your Virtual Private Cloud (VPC) to communicate privately with AWS services without requiring an Internet Gateway, NAT Gateway, or public IP address. These endpoints are powered by AWS PrivateLink, which creates a private connection between your VPC and supported AWS services.
Key Concept:
An AWS Interface Endpoint creates a private network interface inside your VPC that allows secure communication with AWS services through the AWS internal network.How AWS Interface Endpoints Work
When you create an Interface Endpoint, AWS provisions an Elastic Network Interface (ENI) within one or more subnets in your VPC. This ENI receives a private IP address that acts as the entry point for traffic destined for the AWS service.
The traffic flow typically looks like this:
- Application inside a private subnet sends traffic to the service endpoint
- DNS resolves the AWS service hostname to the Interface Endpoint
- Traffic is routed through AWS PrivateLink
- The request reaches the AWS service securely without touching the public internet
AWS Interface Endpoint Architecture

Example architecture showing private connectivity between a VPC and AWS services using an Interface Endpoint.
Common AWS Services Using Interface Endpoints
Many AWS services support Interface Endpoints, allowing secure and private communication from your VPC:
- AWS Secrets Manager
- AWS Systems Manager
- Amazon CloudWatch
- AWS Key Management Service (KMS)
- Amazon Elastic Container Registry (ECR)
- AWS Security Token Service (STS)
- Amazon SNS
These endpoints are especially useful in environments where outbound internet access is restricted or tightly controlled.
Interface Endpoints vs Gateway Endpoints
Feature Interface Endpoint Gateway Endpoint Powered By AWS PrivateLink Route Table Entry Uses ENI Yes No Supported Services Many AWS Services S3 & DynamoDB Cost Hourly + Data Processing Free Common Interface Endpoint Gotchas
- DNS Configuration: Private DNS must be enabled for the endpoint to override the public service hostname.
- Availability Zones: Endpoints should be deployed in each AZ where workloads run.
- Security Groups: Interface Endpoints are controlled by security groups, which can block traffic if misconfigured.
- Costs Add Up: Each endpoint incurs hourly charges plus data processing fees.
- Multiple Endpoints Required: Some services require multiple endpoints (example: ECR + S3).
Real-World Use Case
A common enterprise pattern is running applications in fully private subnets with no internet access. Instead of routing traffic through a NAT Gateway, organizations deploy Interface Endpoints for services such as Secrets Manager, CloudWatch, and Systems Manager.
This design significantly reduces attack surface while allowing applications to continue interacting with AWS APIs securely.
Stay Ahead in Cloud Architecture
If you enjoyed this article, follow Daily Cloud Blog for more deep dives into cloud architecture, DevOps strategies, and real-world AWS design patterns.
👉 Follow on LinkedIn for new posts and cloud engineering insights.
🔔 Subscribe for weekly articles covering AWS, Azure, DevOps, and modern infrastructure.
Home
1–2 minutes


