-
Key Strategies for Passing the SAA-C03 Exam


Subscribe to continue reading
Subscribe to get access to the rest of this post and other subscriber-only content.
-
Understanding Microsoft Defender’s Role in Modern Cybersecurity
By Daily Cloud Blog
Practical cloud, security, and infrastructure insights for modern IT professionals.
Microsoft Defender: A Modern Approach to Enterprise Security
Cybersecurity has evolved far beyond traditional antivirus software. Today’s threats are stealthy, identity-focused, and cloud-aware — and defending against them requires visibility, automation, and correlation across your entire environment.
That’s where Microsoft Defender comes in.
Once known simply as Windows Defender, Microsoft Defender is now a full enterprise security platform delivering XDR (Extended Detection and Response) across endpoints, identities, email, applications, and cloud workloads.
What Is Microsoft Defender?
Microsoft Defender is a unified security ecosystem tightly integrated with Microsoft 365 and Azure. It enables security teams to:
- Detect advanced threats using AI and behavioral analytics
- Correlate alerts into a single incident timeline
- Automate investigation and remediation
- Reduce alert fatigue and SOC burnout
Instead of reacting to thousands of alerts, teams focus on high-confidence incidents.
Microsoft Defender Product Suite a Quick Breakdown
Defender for Endpoint

Advanced endpoint protection for Windows, macOS, Linux, iOS, and Android.
Use case:
Detects fileless attacks, ransomware behavior, and lateral movement — even when no malware file exists.
Defender for Identity

Protects on-prem and hybrid Active Directory environments.
Why it matters:
Most breaches begin with credential theft, not malware.
Defender for Office 365

Email and collaboration security for Outlook, Teams, SharePoint, and OneDrive.
Stops:
Phishing, malicious attachments, business email compromise (BEC).
Defender for Cloud
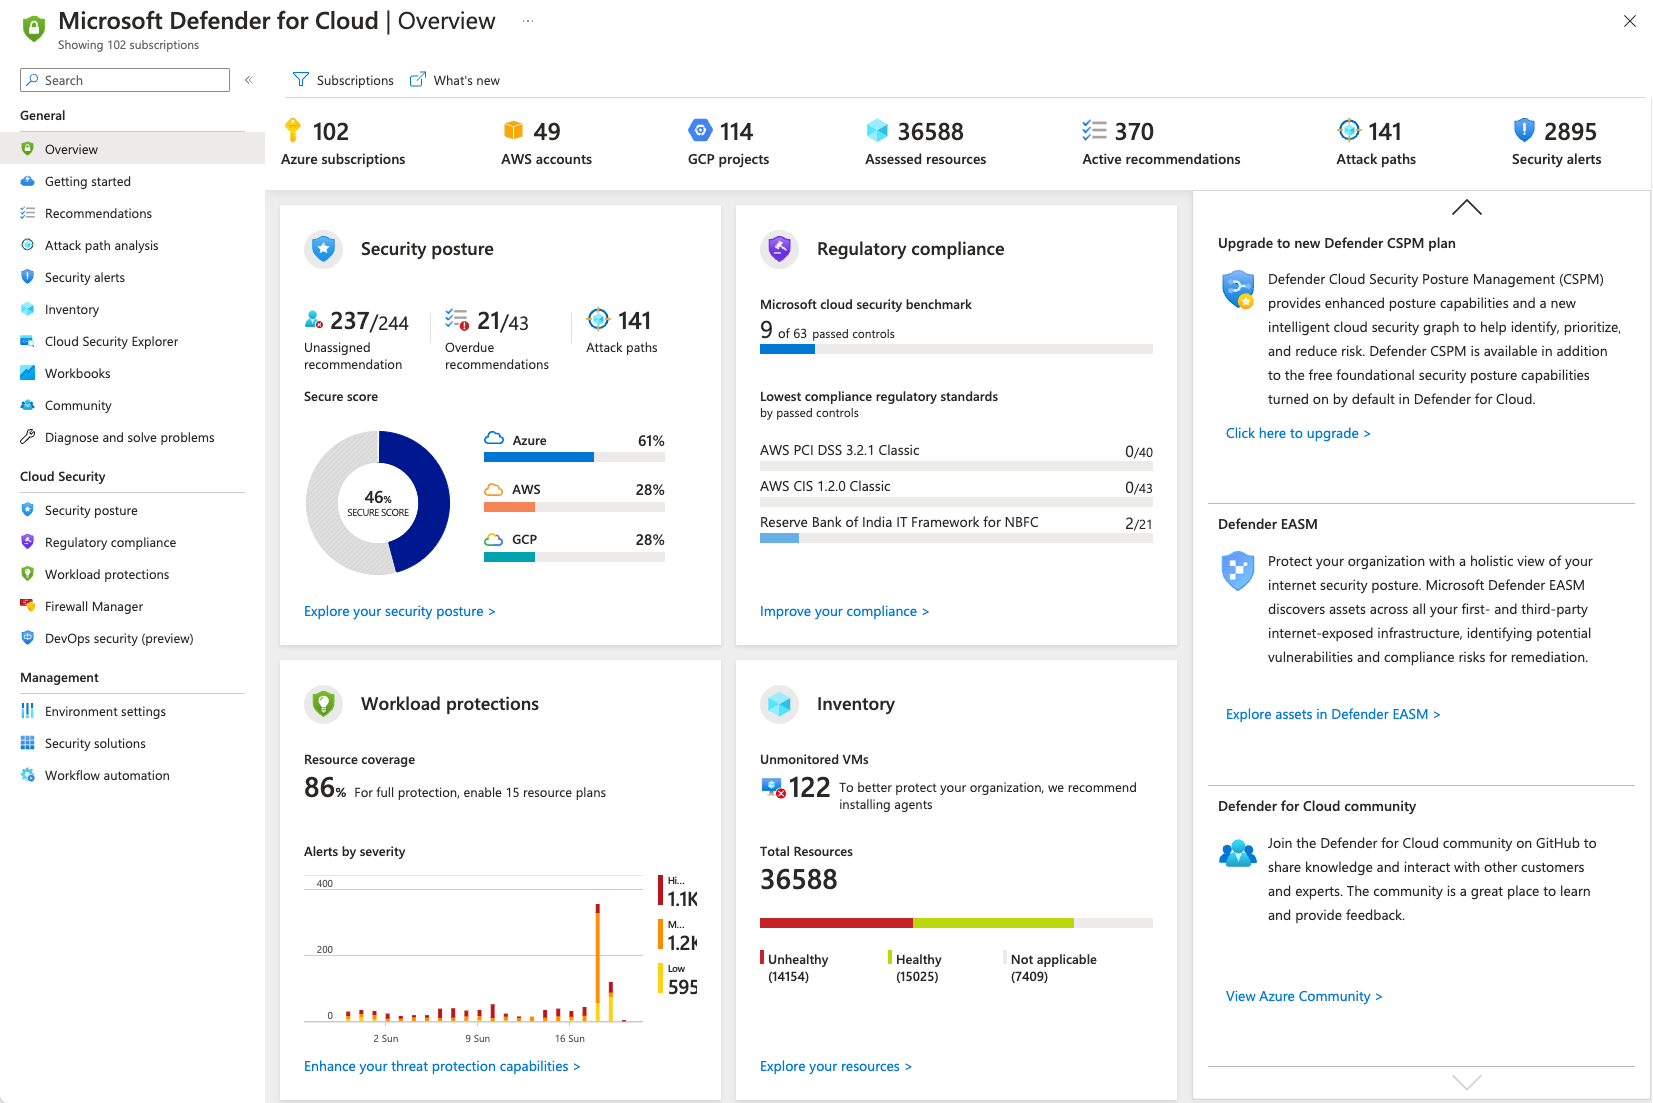
Secures Azure, AWS, GCP, and on-prem workloads.
Highlights:
- Cloud Security Posture Management (CSPM)
- Vulnerability detection
- Regulatory compliance alignment
The Real Power: Defender XDR
Microsoft Defender’s biggest strength is XDR correlation.

Instead of isolated alerts, Defender:
- Connects endpoint, identity, email, and cloud signals
- Builds a single attack narrative
- Automates containment actions

This dramatically improves:
- Mean Time to Detect (MTTD)
- Mean Time to Respond (MTTR)
Why Microsoft Defender Is Gaining Momentum
✔ Native Microsoft integration
✔ Lower total cost of ownership
✔ Strong Zero Trust alignment
✔ Built-in automation and response
✔ Scales from SMB to federal environmentsFor Microsoft-centric organizations, Defender often replaces multiple security tools.
Final Thoughts
Microsoft Defender has matured into a top-tier enterprise security platform. When deployed correctly, it delivers deep protection without unnecessary complexity.
For organizations already invested in Microsoft, Defender isn’t just security — it’s security strategy.
For more information about Microsoft Defender, visit the Microsoft Defender Official Site HERE
📌 More security insights at Daily Cloud Blog
-
Azure Entra ID – A Simple, Straightforward Overview

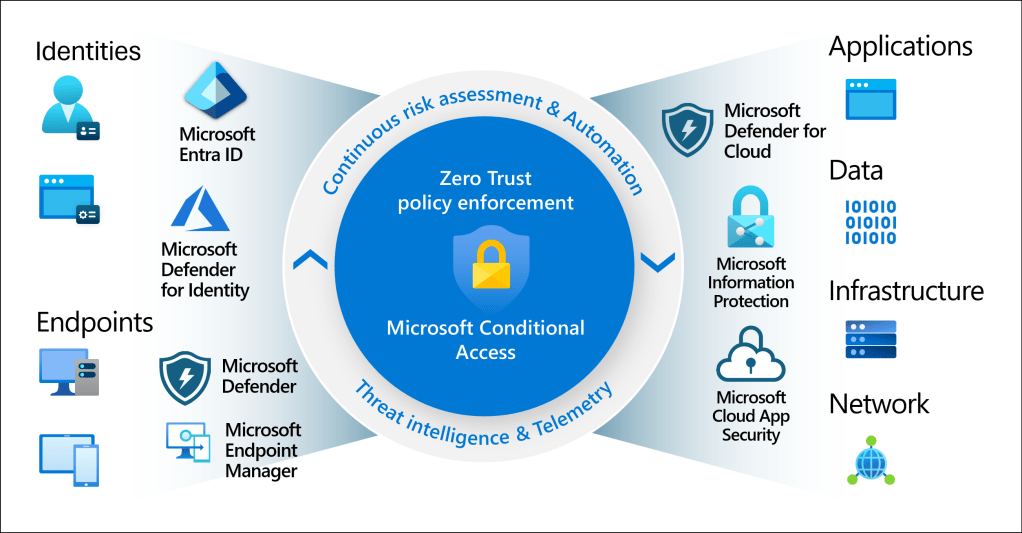
Image courtesy of Microsoft
So, What Is Azure Entra ID?
Azure Entra ID (formerly Azure Active Directory) is Microsoft’s cloud service for managing identities and access. In plain terms, it controls who can sign in, what they can access, and under what conditions.
If your company uses Azure, Microsoft 365, or any modern SaaS apps, Azure Entra ID is already working behind the scenes.
Why Identity Matters
In today’s world, networks aren’t the main security boundary anymore—identity is.
Users log in from:
- Home
- Coffee shops
- Mobile devices
- Multiple clouds
Azure Entra ID makes sure access is secure, verified, and intentional, no matter where users are.
What Azure Entra ID Actually Does
1. Handles Sign-In (Authentication)
Azure Entra ID verifies who you are when you sign in.
It supports:
- Username & password
- Multi-Factor Authentication (MFA)
- Passwordless sign-in
- Security keys (FIDO2)
- Certificates
This helps protect against stolen passwords and phishing attacks.
2. Controls Access (Authorization)
Once you’re signed in, Entra ID decides what you’re allowed to access:
- Azure resources
- Microsoft 365
- SaaS apps
- Internal applications
This is done using:
- Roles
- Groups
- App permissions
- Least privilege access
3. Single Sign-On (SSO)
SSO means:
Log in once → access everything you’re allowed to use.
Azure Entra ID provides SSO to:
- Microsoft 365
- Azure Portal
- Thousands of SaaS apps
- Custom apps
This improves security and user experience at the same time.
4. Conditional Access (Smart Security Rules)
Conditional Access lets you set “if-this-then-that” rules for access.
Examples:
- Require MFA if signing in from outside the country
- Block access from risky locations
- Allow access only from compliant devices
- Add extra checks for admin users
This is the backbone of Zero Trust security.
5. Protects Against Risky Logins
Azure Entra ID uses Microsoft’s threat intelligence to spot:
- Suspicious sign-ins
- Unusual locations
- Compromised credentials
When something looks risky, it can:
- Force MFA
- Block the sign-in
- Require a password reset
All automatically.
6. Works with On-Prem Active Directory
If you still have on-prem Active Directory, no problem.
Azure Entra ID supports hybrid identity, allowing:
- One username/password for cloud & on-prem
- Seamless SSO
- Gradual cloud migration
This is common in real-world enterprise environments.
7. Manages Users, Devices, and Apps
Azure Entra ID doesn’t just manage people:
- Users
- Devices (Azure AD Join / Hybrid Join)
- Applications
- Service accounts
- Cloud workloads
It also integrates tightly with tools like Intune, Defender, and Azure RBAC.
Where You’ll Commonly See It Used
- Securing Microsoft 365
- Protecting Azure subscriptions
- Enabling SaaS app SSO
- Enforcing Zero Trust
- Partner access (B2B)
- Customer sign-ins (B2C)
- Cloud-native app authentication
Licensing (Quick Version)
- Free – Basic identity & SSO
- Premium P1 – Conditional Access, hybrid features
- Premium P2 – Advanced security, identity risk detection, PIM
Why Azure Entra ID Is a Big Deal
Azure Entra ID gives you:
- Centralized identity control
- Strong security without killing productivity
- Cloud-scale reliability
- Deep Microsoft ecosystem integration
If you’re using Azure or Microsoft 365, Azure Entra ID is not optional—it’s foundational.
Final Thoughts
Azure Entra ID is basically the front door to your cloud environment. Lock it down properly, and everything behind it becomes more secure.
Whether you’re:
- Migrating to the cloud
- Building cloud-native apps
- Implementing Zero Trust
- Or just trying to secure users better
Azure Entra ID should be one of the first things you get right.
-
How to Set Up Core Services in Microsoft Azure (with Terraform)
If you’re building an Azure environment for the first time (or rebuilding it correctly), you want a repeatable “core services” foundation: management groups, RBAC, hub-and-spoke networking, policies, logging/monitoring, backup, cost controls, and Defender for Cloud.
This guide includes Terraform you can copy into a repo and run. You’ll plug in your subscription IDs and region, then deploy a baseline foundation in a consistent way.
Prerequisites
- Azure tenant access (Entra ID)
- Permissions: Management Group + Subscription contributor/owner for the target scope
- Terraform 1.6+ installed
- Azure CLI installed and authenticated (
az login)
Repo Layout
azure-core-foundation/
  versions.tf
  providers.tf
  variables.tf
  main.tf
  terraform.tfvars.example
  modules/
    management-groups/
    rbac/
    network-hub-spoke/
    governance-policy/
    monitoring/
    backup/
    cost-management/
    defender/
Step 1: Management Groups + Subscription Organization (Terraform)
Terraform typically does not create Azure subscriptions. Instead, you create subscriptions (Portal / EA / MCA) and Terraform organizes them into management groups with consistent governance.
modules/management-groups/main.tf
resource "azurerm_management_group" "corp" {
  display_name = var.mgmt_group_names.corp
}

resource "azurerm_management_group" "prod" {
  display_name               = var.mgmt_group_names.production
  parent_management_group_id = azurerm_management_group.corp.id
}

resource "azurerm_management_group" "nonprod" {
  display_name               = var.mgmt_group_names.nonproduction
  parent_management_group_id = azurerm_management_group.corp.id
}

resource "azurerm_management_group" "shared" {
  display_name               = var.mgmt_group_names.sharedservices
  parent_management_group_id = azurerm_management_group.corp.id
}

resource "azurerm_management_group_subscription_association" "prod_assoc" {
  management_group_id = azurerm_management_group.prod.id
  subscription_id     = var.subscription_ids.production
}

resource "azurerm_management_group_subscription_association" "nonprod_assoc" {
  management_group_id = azurerm_management_group.nonprod.id
  subscription_id     = var.subscription_ids.nonproduction
}

resource "azurerm_management_group_subscription_association" "shared_assoc" {
  management_group_id = azurerm_management_group.shared.id
  subscription_id     = var.subscription_ids.sharedservices
}
Step 2: IAM / RBAC Baseline (Terraform)
Create Entra ID security groups and assign baseline roles at the management group scope. This gives you repeatable access control aligned with least privilege.
modules/rbac/main.tf
resource "azuread_group" "readers" {
  display_name     = var.reader_group_name
  security_enabled = true
}

resource "azuread_group" "contributors" {
  display_name     = var.contributor_group_name
  security_enabled = true
}

resource "azurerm_role_assignment" "corp_readers" {
  scope                = var.scope_mgmt_group_id
  role_definition_name = "Reader"
  principal_id         = azuread_group.readers.object_id
}

resource "azurerm_role_assignment" "corp_contributors" {
  scope                = var.scope_mgmt_group_id
  role_definition_name = "Contributor"
  principal_id         = azuread_group.contributors.object_id
}
Step 3: Core Networking (Hub-and-Spoke) (Terraform)
This creates a hub VNet, two spoke VNets, subnets, and bi-directional VNet peering. It’s a clean baseline you can expand with Azure Firewall, Bastion, VPN Gateway, Private DNS, NSGs, and UDRs.
modules/network-hub-spoke/main.tf
resource "azurerm_resource_group" "rg" {
  name     = var.resource_group_name
  location = var.location
  tags     = var.tags
}

resource "azurerm_virtual_network" "hub" {
  name                = "${var.resource_group_name}-hub-vnet"
  location            = var.location
  resource_group_name = azurerm_resource_group.rg.name
  address_space       = [var.hub_vnet_cidr]
  tags                = var.tags
}

resource "azurerm_subnet" "hub_subnets" {
  for_each             = var.hub_subnets
  name                 = each.key
  resource_group_name  = azurerm_resource_group.rg.name
  virtual_network_name = azurerm_virtual_network.hub.name
  address_prefixes     = [each.value]
}

resource "azurerm_virtual_network" "spokes" {
  for_each            = var.spoke_vnets
  name                = "${var.resource_group_name}-${each.key}-spoke-vnet"
  location            = var.location
  resource_group_name = azurerm_resource_group.rg.name
  address_space       = [each.value.cidr]
  tags                = var.tags
}

locals {
  spoke_subnet_map = merge([
    for vnet_key, vnet in var.spoke_vnets : {
      for sn_key, sn_cidr in vnet.subnets :
      "${vnet_key}.${sn_key}" => {
        vnet_key = vnet_key
        name     = sn_key
        cidr     = sn_cidr
      }
    }
  ]...)
}

resource "azurerm_subnet" "spokes" {
  for_each             = local.spoke_subnet_map
  name                 = each.value.name
  resource_group_name  = azurerm_resource_group.rg.name
  virtual_network_name = azurerm_virtual_network.spokes[each.value.vnet_key].name
  address_prefixes     = [each.value.cidr]
}

resource "azurerm_virtual_network_peering" "hub_to_spoke" {
  for_each                     = azurerm_virtual_network.spokes
  name                         = "peer-hub-to-${each.key}"
  resource_group_name          = azurerm_resource_group.rg.name
  virtual_network_name         = azurerm_virtual_network.hub.name
  remote_virtual_network_id    = each.value.id
  allow_virtual_network_access = true
  allow_forwarded_traffic      = true
}

resource "azurerm_virtual_network_peering" "spoke_to_hub" {
  for_each                     = azurerm_virtual_network.spokes
  name                         = "peer-${each.key}-to-hub"
  resource_group_name          = azurerm_resource_group.rg.name
  virtual_network_name         = each.value.name
  remote_virtual_network_id    = azurerm_virtual_network.hub.id
  allow_virtual_network_access = true
  allow_forwarded_traffic      = true
}
Step 4: Security & Governance (Azure Policy) (Terraform)
This enforces allowed regions and mandatory tags at the management group scope, preventing common misconfigurations early.
modules/governance-policy/main.tf
resource "azurerm_policy_definition" "allowed_locations" {
  name         = "allowed-locations"
  policy_type  = "Custom"
  mode         = "All"
  display_name = "Allowed locations"

  policy_rule = jsonencode({
    if = {
      not = {
        field = "location"
        in    = "[parameters('listOfAllowedLocations')]"
      }
    }
    then = { effect = "Deny" }
  })

  parameters = jsonencode({
    listOfAllowedLocations = {
      type     = "Array"
      metadata = { displayName = "Allowed locations" }
    }
  })
}

resource "azurerm_policy_assignment" "allowed_locations" {
  name                = "pa-allowed-locations"
  scope               = var.mgmt_group_id_corp
  policy_definition_id = azurerm_policy_definition.allowed_locations.id

  parameters = jsonencode({
    listOfAllowedLocations = { value = var.allowed_locations }
  })
}

resource "azurerm_policy_definition" "require_tags" {
  name         = "require-tags"
  policy_type  = "Custom"
  mode         = "Indexed"
  display_name = "Require resource tags"

  policy_rule = jsonencode({
    if = {
      anyOf = [
        for t in var.required_tags : {
          field  = "tags[${t}]"
          exists = "false"
        }
      ]
    }
    then = { effect = "Deny" }
  })
}

resource "azurerm_policy_assignment" "require_tags" {
  name                 = "pa-require-tags"
  scope                = var.mgmt_group_id_corp
  policy_definition_id = azurerm_policy_definition.require_tags.id
}
Step 5: Monitoring & Logging (Log Analytics) (Terraform)
modules/monitoring/main.tf
resource "azurerm_resource_group" "rg" {
  name     = var.resource_group_name
  location = var.location
  tags     = var.tags
}

resource "azurerm_log_analytics_workspace" "law" {
  name                = var.law_name
  location            = var.location
  resource_group_name = azurerm_resource_group.rg.name
  sku                 = "PerGB2018"
  retention_in_days   = 30
  tags                = var.tags
}
Step 6: Backup & Recovery (Recovery Services Vault) (Terraform)
modules/backup/main.tf
resource "azurerm_resource_group" "rg" {
  name     = var.resource_group_name
  location = var.location
  tags     = var.tags
}

resource "azurerm_recovery_services_vault" "rsv" {
  name                = var.rsv_name
  location            = var.location
  resource_group_name = azurerm_resource_group.rg.name
  sku                 = "Standard"
  soft_delete_enabled = true
  tags                = var.tags
}
Step 7: Cost Controls (Budgets + Alerts) (Terraform)
modules/cost-management/main.tf
resource "azurerm_consumption_budget_subscription" "budget" {
  name            = "monthly-budget"
  subscription_id = var.subscription_id

  amount     = var.monthly_budget
  time_grain = "Monthly"

  time_period {
    start_date = "2025-01-01T00:00:00Z"
    end_date   = "2035-01-01T00:00:00Z"
  }

  notification {
    enabled        = true
    threshold      = 80
    operator       = "GreaterThan"
    contact_emails = var.emails
  }

  notification {
    enabled        = true
    threshold      = 100
    operator       = "GreaterThan"
    contact_emails = var.emails
  }
}
Optional: Defender for Cloud Baseline (Terraform)
modules/defender/main.tf
provider "azurerm" {
  alias           = "sub"
  features        {}
  subscription_id = var.subscription_id
}

resource "azurerm_security_center_subscription_pricing" "vm" {
  provider      = azurerm.sub
  tier          = "Standard"
  resource_type = "VirtualMachines"
}
Run It
- Create a
terraform.tfvarsfile (example below) - Run:
terraform init - Run:
terraform plan - Run:
terraform apply
For all Code Files, visit the following GitHub Repository:
https://github.com/mbtechgru/Azure_Core_Services.git
-
Understanding ROSA: Managed OpenShift Simplified


Overview of ROSA Architecture Diagram
When I first started working with ROSA, I’ll be honest — I was overthinking it. I was coming from months, maybe over a year now, of dealing with:
- self-managed Kubernetes,
- DIY OpenShift installs,
- control planes that everyone pretends are easy until something breaks at 2 a.m.
So when someone said, “ROSA is just managed OpenShift on AWS,” my immediate reaction was:
Okay… but who actually owns what when things go wrong?
That question is what this post is really about.
The One Sentence That Changed Everything for Me
Here’s the sentence that finally made ROSA click:
Red Hat runs the control plane. I run my workloads in my AWS account.
That’s it.
Once I stopped trying to mentally map ROSA as “EKS but different” and instead saw it as a clean ownership split, everything else started to make sense.
How ROSA Is Really Split (In Practice)
The Control Plane (Not My Problem — and That’s a Good Thing)
The first thing I had to accept was that I don’t touch the control plane.
No:
- API server patching
- etcd tuning
- upgrade choreography
- “don’t reboot that node yet” moments
All of that lives in Red Hat–managed AWS accounts.
At first, that felt uncomfortable — engineers like control.
But then I realized something important:I’ve never once added business value by babysitting a Kubernetes control plane.
Red Hat:
- patches it,
- upgrades it,
- monitors it,
- keeps it highly available.
And I get to focus on things that actually matter to my team and my customers.
The Worker Nodes (Very Much My Responsibility)
This is where ROSA started to feel familiar again.
The worker nodes:
- live in my AWS account,
- sit inside my VPC,
- run in my subnets.
This is where:
- applications run,
- containers execute,
- data is processed.
From a security and compliance standpoint, this was huge for me — especially thinking about government and regulated environments.
My data never leaves my AWS account.
That one fact alone removes a lot of friction in security conversations.
The AWS Account Model (Why Security Teams Like ROSA)
In real-world terms, ROSA usually looks like this:
- Red Hat AWS account → control plane
- My AWS account → worker nodes, networking, data
That separation is intentional.
When I had to explain ROSA to security stakeholders, this model actually made the conversation easier, not harder. It’s a very clean boundary, and clean boundaries are exactly what auditors like.
Networking: Where I Stopped Guessing and Started Understanding
Networking is usually where platforms fall apart mentally. ROSA was no exception — until I traced the traffic flow end to end.
Here’s the simplified version I keep in my head now:
User → AWS Load Balancer → OpenShift Router → Service → Pod
A few key realizations for me:
- ROSA uses OpenShift Routes, not raw Kubernetes Ingress
- AWS still handles the heavy lifting at the edge
- OpenShift handles how traffic gets to apps inside the cluster
Once I accepted that Routes are just the OpenShift-native way of doing ingress, I stopped fighting it — and it became one of my favorite features.
(We’ll go deep on this in a later part of the series.)
Identity and Access (Less Magic Than It Looks)
At first glance, ROSA IAM + RBAC looks complex.
In reality, I think of it like this:
- AWS IAM decides who can interact with AWS
- OpenShift RBAC decides what users can do inside the cluster
That separation is actually really powerful. It lets platform teams control the platform without stepping on application teams — something I wish more environments did by default.
The Shared Responsibility Model (The Part You Can’t Ignore)
This was another mindset shift for me.
Red Hat owns:
- control plane uptime,
- platform patching,
- Kubernetes upgrades.
I own:
- applications,
- app security,
- configuration,
- access decisions,
- data protection.
Once I stopped assuming “managed” meant “someone else handles everything,” ROSA became very predictable.
And predictable platforms are the ones that scale well.
Why This Architecture Grew on Me
After spending time with ROSA, here’s why I genuinely like this model:
- I don’t waste energy on undifferentiated platform work
- Security boundaries are clear and defensible
- Compliance conversations are simpler
- Platform teams can focus on enablement instead of firefighting
It feels like OpenShift grown up for real-world operations.
No Lab This Time — And That’s Intentional
This part isn’t about clicking buttons or running commands.
It’s about getting the mental model right.
If you understand:
- where things live,
- who owns what,
- how traffic flows,
then everything we do next will feel logical instead of magical.
-
Part 1: What Is Red Hat OpenShift Service on AWS (ROSA)?
Introduction
If you’ve ever thought:
“Kubernetes is powerful… but running it ourselves is a lot of work”
That’s exactly where Red Hat OpenShift Service on AWS (ROSA) fits in.
ROSA gives you a fully managed OpenShift platform running directly on AWS, jointly supported by Red Hat and AWS. You get the benefits of Kubernetes and OpenShift without having to manage the control plane yourself.
This series will show you how to go from cluster access to running real applications on ROSA, step by step.
What Is ROSA (Without the Marketing Speak)?
ROSA is:
- OpenShift running natively on AWS
- Managed by Red Hat (OpenShift components)
- Running inside your AWS account
- Integrated with AWS networking, IAM, and load balancers
You:
- Deploy apps
- Manage namespaces and workloads
- Control access and security
Red Hat:
- Manages the OpenShift control plane
- Handles upgrades and platform reliability
AWS:
- Provides the infrastructure (VPC, EC2, ELB, storage)
How ROSA Compares to Amazon EKS
Feature ROSA EKS Kubernetes Management Fully managed OpenShift Managed Kubernetes only Built-in CI/CD & Dev Tools Yes No Security Controls Strong defaults DIY Enterprise Support Red Hat + AWS AWS only Operational Overhead Lower Higher Simple rule:
If you want enterprise Kubernetes with guardrails, ROSA wins.
If you want raw Kubernetes, EKS may be better.
Typical ROSA Architecture

A standard ROSA deployment includes:
- An AWS VPC with public and private subnets
- OpenShift control plane managed by Red Hat
- Worker nodes in private subnets
- AWS load balancers exposing apps
- Native AWS storage and networking
This makes ROSA a great fit for secure and regulated environments.
When Should You Use ROSA?
ROSA is a strong choice if you:
- Need enterprise Kubernetes
- Want OpenShift features without managing it
- Are deploying mission-critical apps
- Operate in regulated or government environments
- Want tight AWS integration
What You’ll Learn in This Series
By the end of this series, you’ll know how to:
- Access and manage a ROSA cluster
- Deploy and expose applications
- Scale workloads
- Apply security best practices
- Operate ROSA in production
No fluff — just practical steps.
What’s Next?
👉 Part 2: Prerequisites and Environment Setup
In the next post, we’ll:
- Set up AWS and Red Hat access
- Install the required CLI tools
- Verify cluster connectivity
- Avoid common permission issues
-
Mastering OpenShift on AWS: A Step-by-Step Series
This series walks you from zero to production-ready on ROSA, without assuming deep OpenShift experience.
Series Overview
Part 1 – What Is ROSA and When Should You Use It?
- What ROSA is (plain English)
- How it compares to EKS
- Common enterprise & government use cases
- Architecture overview
Part 2 – Prerequisites and Environment Setup
- AWS & Red Hat accounts
- IAM permissions
- Installing CLI tools
- Verifying access
Part 3 – Creating and Accessing a ROSA Cluster
- Cluster sizing choices
- Networking basics
- Logging in with
oc - Understanding projects, users, and roles
Part 4 – Deploying Your First Application
- Creating a project
- Deploying an app from an image
- Understanding deployments, pods, and services
Part 5 – Exposing Applications with Routes and Load Balancers
- OpenShift Routes explained
- AWS load balancer integration
- TLS and HTTPS basics
Part 6 – Scaling and Managing Applications
- Manual scaling
- Autoscaling basics
- Rolling updates
Part 7 – Security Best Practices for ROSA
- Security Context Constraints (SCCs)
- IAM Roles for Service Accounts (IRSA)
- Network policies
- Image security
Part 8 – Monitoring, Logging, and Operations
- OpenShift monitoring
- AWS CloudWatch integration
- Day-2 operations tips
Part 9 – Production Readiness Checklist
- High availability
- Cost optimization
- Backup considerations
- Compliance notes
Stay Tune as I start sharing my experience throughout this journey of OpenShift on AWS
-
Deploying a NetApp Filer using Windows PowerShell and NetApp Power Shell Module
A PowerShell module for managing and automating NetApp operations.
Overview
NetApp-PowerShell is a robust suite of PowerShell scripts and cmdlets meticulously crafted to enhance the efficiency of NetApp storage management. This module facilitates the automation of essential tasks such as provisioning, monitoring, backup, and reporting through PowerShell, significantly streamlining the interactions for administrators and DevOps professionals with NetApp storage systems. Additionally, it offers the capability to automate the entire NetApp Filer deployment process, ensuring a more efficient and error-free implementation through this comprehensive PowerShell script.
Features
- Connect to NetApp storage controllers
- Perform common storage tasks like creating/deleting volumes, snapshots, and aggregates
- Query NetApp system health and performance metrics
- Automate backup operations
- Generate reports
- Integration with CI/CD workflows
Getting Started
Prerequisites
- PowerShell 5.1 or later (Windows, Linux, or macOS)
- Access to NetApp API (ONTAP)
Installation
You can clone this repository and import the module manually:
git clone https://github.com/mbtechgru/NetApp-PowerShell.git
Import-Module ./NetApp-PowerShell/NetAppPowerShell.psm1
Usage
- Connect to NetApp system:
Connect-NetAppController -Address <controller-address> -Username <username> -Password <password> - List volumes:
Get-NetAppVolume - Create a volume:
New-NetAppVolume -Name "TestVolume" -Size "100GB"
For detailed cmdlet documentation, see the module help or usage examples in the
docs/folder (if available).Contributing
Contributions and feature requests are welcome! Please fork the repository and submit a pull request or open an issue for suggestions and bugs.
-
Beginner’s Guide to Kubernetes: What It Is, How It Works, and Why It Matters
Introduction
Kubernetes (often shortened to K8s) is the most powerful and widely adopted system for running containerized applications at scale. If Docker helps you package applications, Kubernetes helps you run, scale, update, and maintain those applications in production.
In this beginner-friendly guide, we’ll break down Kubernetes in simple terms — no prior experience needed.
🧱 What is Kubernetes?
Think of Kubernetes as:
A smart, automated system that ensures your applications are always running — even if servers fail or traffic spikes.
If your application lives inside containers, Kubernetes is the brain that:
- Starts containers
- Repairs containers if they crash
- Distributes containers across machines
- Scales replicas up or down
- Updates apps with zero downtime
🏗️ Key Kubernetes Concepts
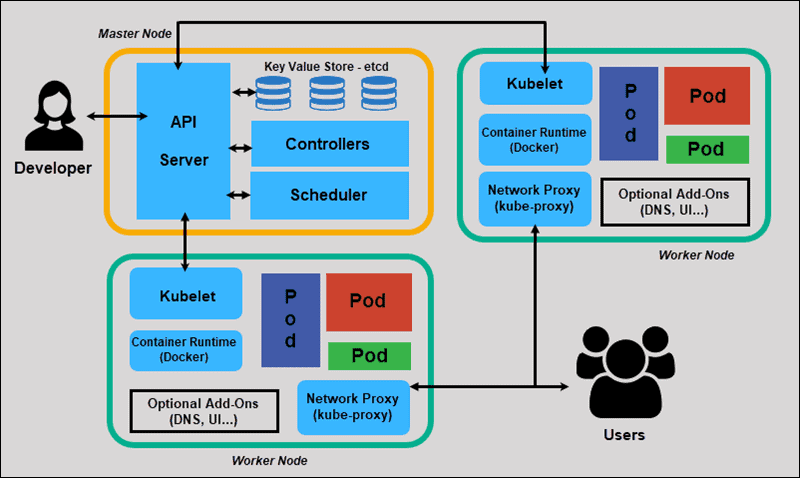
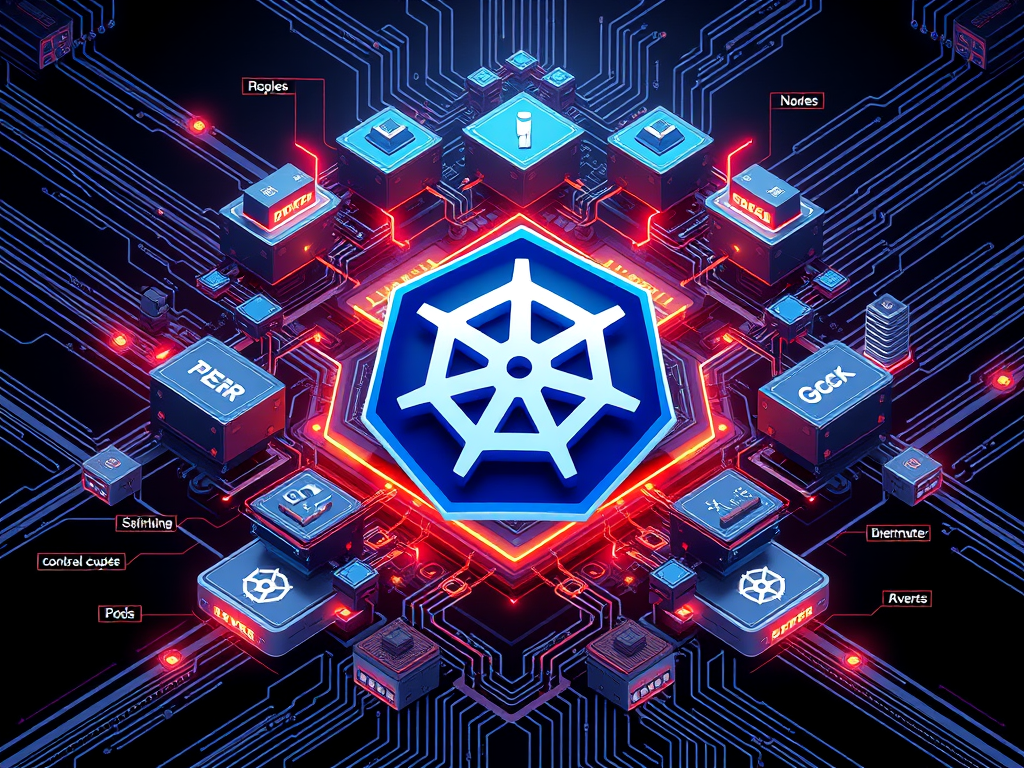
Image Description: A visual representation of Kubernetes architecture and its components, showcasing how different elements interact within a Kubernetes cluster.
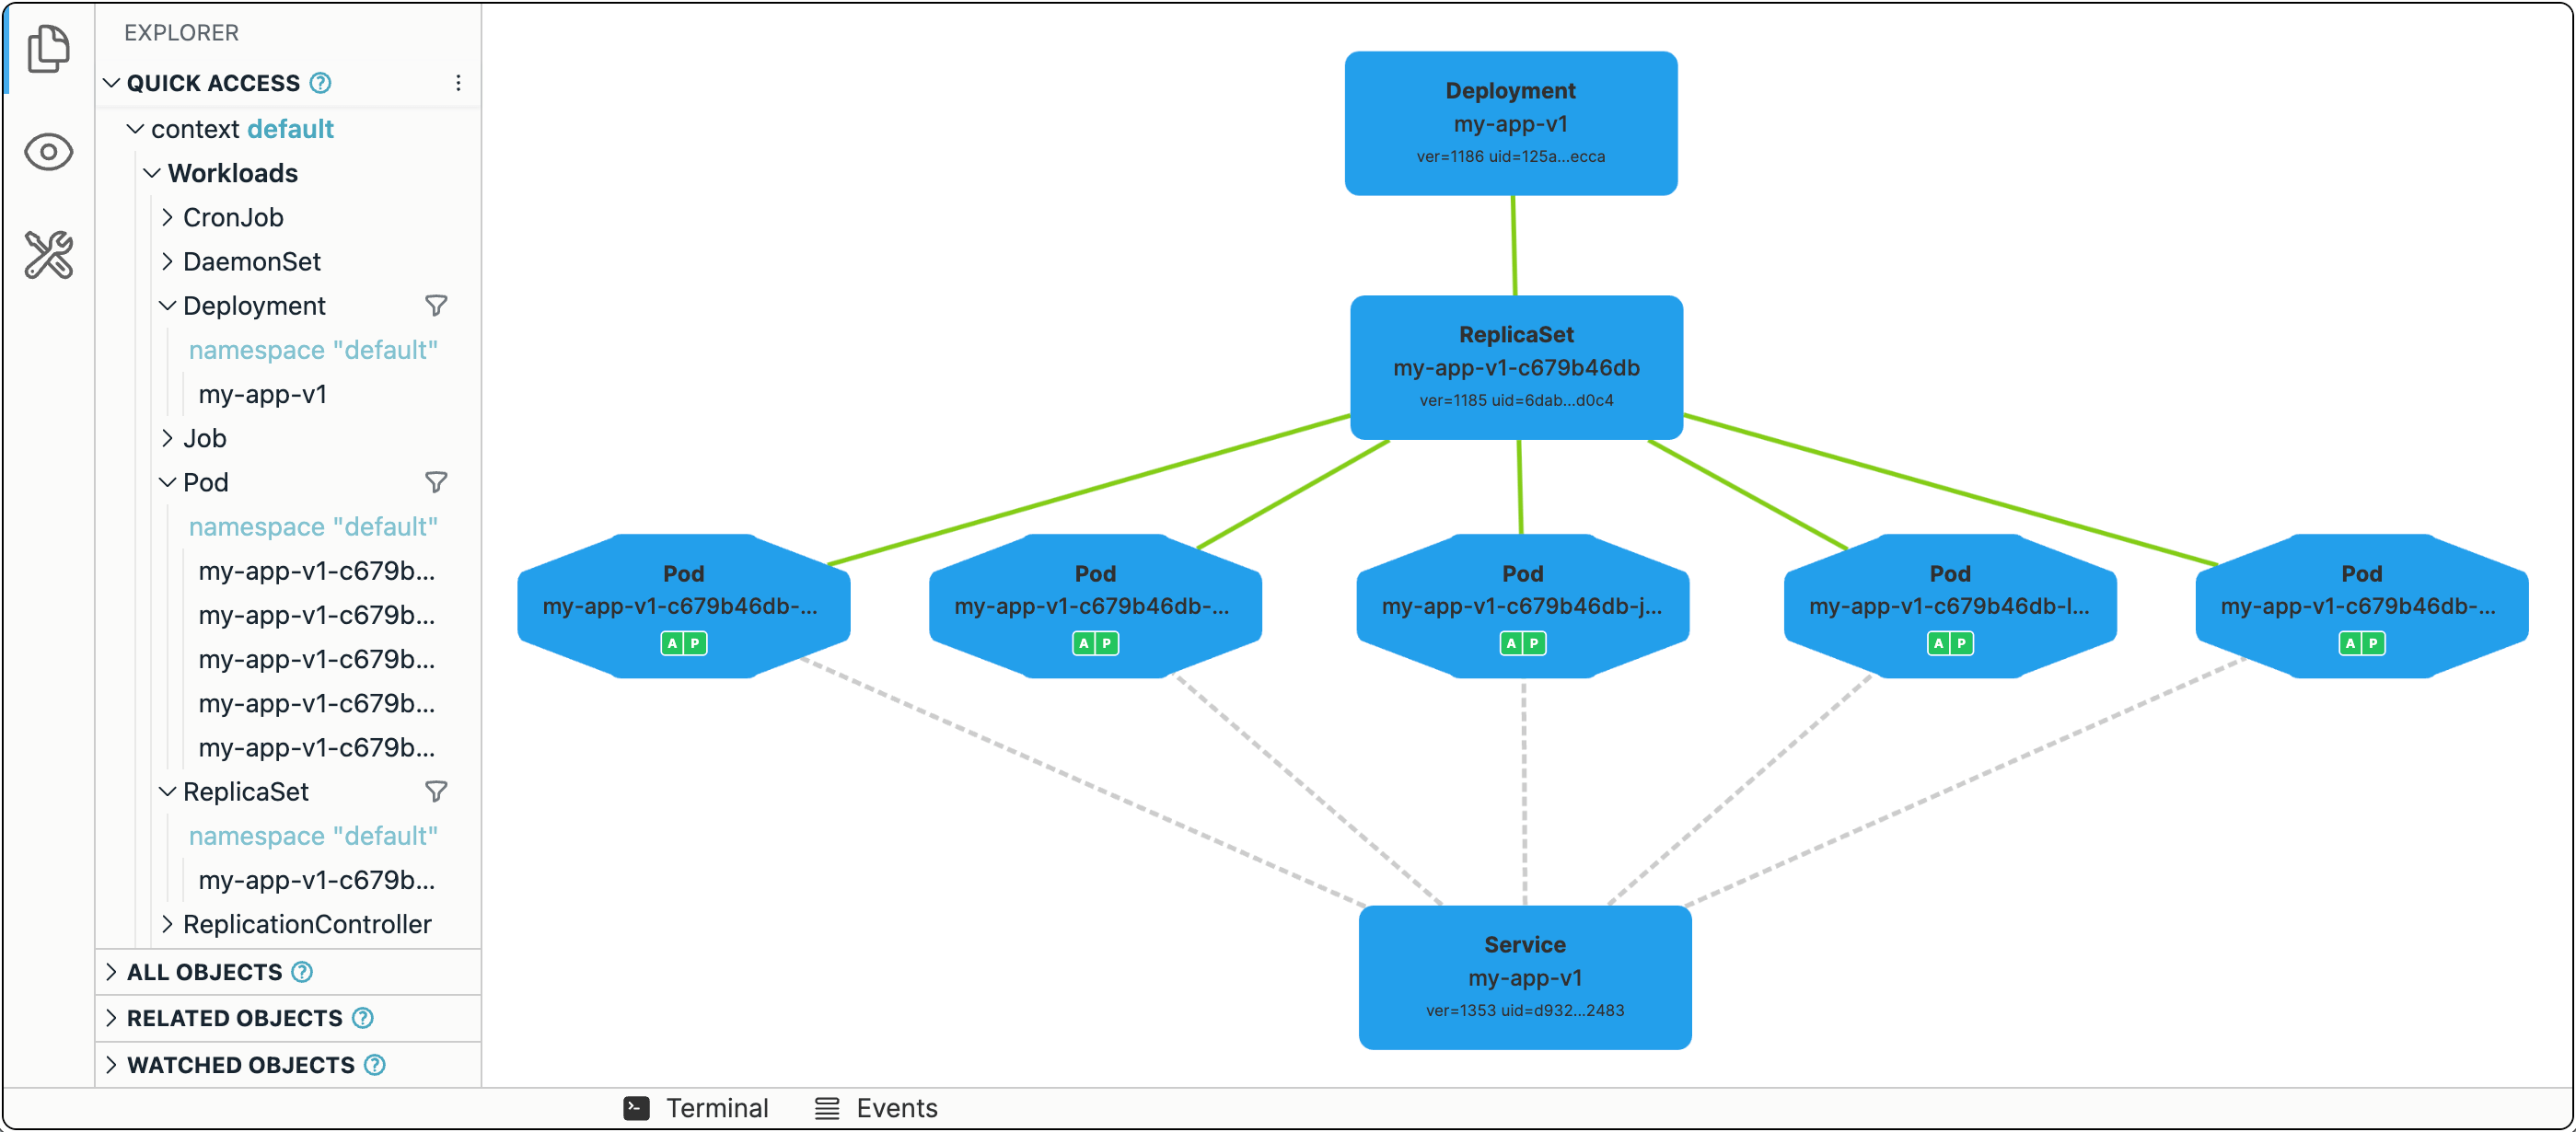
The images above visually represent the architecture and components of a Kubernetes cluster. They illustrate how various elements, such as pods, nodes, and services, interact within a Kubernetes environment. The diagrams highlight the structure that enables Kubernetes to manage containerized applications effectively, showcasing the control plane’s role and the distribution of workloads across worker nodes. These visual aids serve as a helpful reference for understanding Kubernetes’ complex functionalities and overall framework.
1️⃣ Cluster
A Kubernetes cluster is made up of:
- Master (control plane) — the brain
- Worker nodes — where containers run
2️⃣ Nodes
A node is a server (virtual or physical).
Kubernetes spreads workloads across nodes automatically.3️⃣ Pods
Smallest unit in Kubernetes.
A pod = one or more containers working together.
If containers need to share storage or network, put them in the same pod.4️⃣ Deployments
A deployment tells Kubernetes:
- what container image to run
- how many replicas to maintain
- how to roll out updates safely
5️⃣ Services
A service gives your pods a stable network identity — even when pods restart or move.
Types:
- ClusterIP (internal)
- NodePort (external)
- LoadBalancer (cloud-integrated)
- Ingress (HTTP/HTTPS routing)
🚀 Why Use Kubernetes? (Benefits)
✔️ High Availability
If a pod or node fails, Kubernetes restarts or relocates it instantly.
✔️ Automatic Scaling
Traffic spike? Kubernetes adds replicas.
Traffic drops? It scales down to save money.✔️ Zero-Downtime Updates
Using rolling updates and rollbacks.
✔️ Consistent Across Clouds
Run Kubernetes on:
- AWS (EKS)
- Azure (AKS)
- Google Cloud (GKE)
- On-Prem or Bare Metal
✔️ Community, Ecosystem, and Extensibility
Thousands of add-ons:
- Prometheus / Grafana
- Istio
- ArgoCD
- Helm
⚙️ How Kubernetes Works (Easy Visualization)
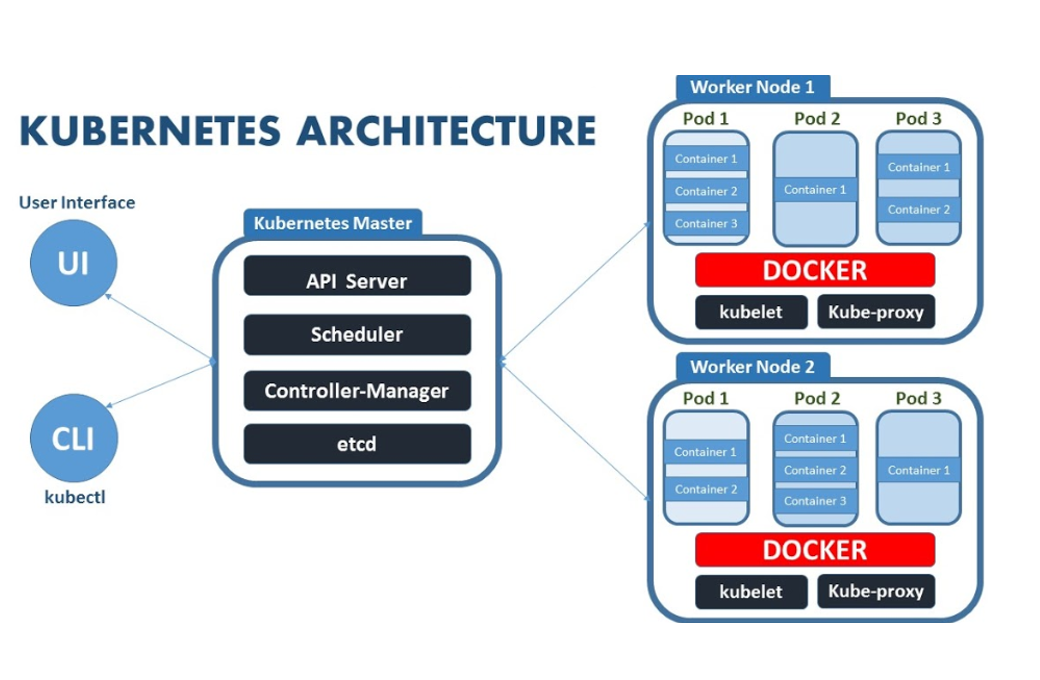
Image Description: Kubernetes Architecture Diagram
Simple workflow:
- You write a deployment YAML describing how your app should run
- You apply it to the cluster
- Kubernetes scheduler finds appropriate nodes
- Pods get created
- Services expose the app
- Kubernetes continuously monitors health
- Autoscaler adjusts replicas based on demand
🧪 Hands-On Example 101
Here’s a minimal example deployment:
apiVersion: apps/v1
kind: Deployment
metadata:
  name: hello-world
spec:
  replicas: 3
  selector:
    matchLabels:
      app: hello-world
  template:
    metadata:
      labels:
        app: hello-world
    spec:
      containers:
      - name: hello-world
        image: nginx
        ports:
        - containerPort: 80
Expose it:
kubectl expose deployment hello-world --type=LoadBalancer --port=80
This creates:
- a deployment with 3 pods
- a service that exposes them to the internet (if supported by cloud provider)
🔒 Basic Security Tips for Beginners
Even on day one, consider these:
- Always use namespaces (dev, staging, production)
- Avoid running containers as root
- Limit resource usage (CPU/memory)
- Use role-based access control (RBAC)
- Scan container images
🌐 Where to Run Kubernetes?
Cloud Options
- AWS EKS
- Azure AKS
- Google GKE
Local Options
- Docker Desktop
- Minikube
- kind (Kubernetes in Docker)
🏁 Conclusion
Kubernetes is an orchestration system that keeps modern applications healthy, scalable, and resilient. Even though it looks intimidating at first, learning the basics — pods, deployments, services, nodes — unlocks enormous power.
-
AWS announce new feature for Route 53 Service

Amazon AWS has just unveiled an exciting new feature for its Route 53 DNS Service, aptly named Accelerate Recovery. This innovative addition comes in response to the recent DNS disruptions that affected businesses in the AWS East-1 Region, plunging many into operational chaos. With Accelerate Recovery, AWS aims to empower organizations to swiftly recover from such disruptions, minimizing downtime and ensuring smoother business operations. It’s a significant step forward in reinforcing reliability and trust in AWS’s services, making it an essential tool for businesses looking to safeguard their online presence.
Here is the Original Blog from AWS:
Enhancing DNS Resilience: A Look at New Route 53 Features
In today’s digital landscape, ensuring the dependable delivery of online services is paramount. Service disruptions can occur at any time, and being prepared is essential. Amazon Web Services (AWS) has rolled out a new feature that significantly enhances the resilience of Domain Name System (DNS) entries through its Route 53 service.
Targeted DNS Entries for Faster Recovery
This new functionality focuses on targeting specifically public DNS entries within 60 minutes of a service disruption and it is only available as of today on US East Region (N. Virgina). This rapid response is crucial for maintaining service continuity and minimizing downtime for users.
The feature provides seamless access to a range of API actions, particularly when services are failing over to alternate regions, predominantly in US West (Oregon).
Simple and Straightforward Implementation
One of the standout aspects of this new feature is its ease of use. According to AWS, there’s no need to change endpoints or recreate any public records in different regions. The operations can be enabled or disabled effortlessly through the AWS Web Console, AWS Command Line Interface (CLI), Software Development Kits (SDKs), or Infrastructure as Code (IaC) tools, including CloudFormation and AWS CDK, as noted in the official documentation.
This means that developers and system admins can quickly implement necessary changes without the hassle of intricate configurations or downtime.
Stay Informed
For those looking to dive deeper into the specifics and capabilities of this new feature, AWS offers comprehensive documentation. By reviewing the full details, users can ensure that they are fully equipped to leverage this powerful toolset to bolster their DNS infrastructure.
In conclusion, AWS’s enhancements to Route 53 present an invaluable opportunity for businesses seeking to maintain service reliability and enhance their response strategies during disruptions. Stay proactive and informed—it’s the best defense against downtime!
https://docs.aws.amazon.com/Route53/latest/DeveloperGuide/accelerated-recovery.html
Home
1–2 minutes

