-
How to Deploy and Configure Kali Linux on AWS
Kali Linux is one of the most popular penetration testing and ethical hacking distributions used by cybersecurity professionals. Running Kali Linux in the cloud, specifically on Amazon Web Services (AWS) provides flexibility, scalability, and the ability to conduct remote security assessments securely. In this post, we’ll walk through step-by-step instructions to deploy and configure Kali Linux on AWS, along with best practices for securing and optimizing your cloud instance.
Prerequisites
- An AWS account (with permissions to launch EC2 instances)
- Basic understanding of Linux commands
- An SSH key pair or plan to create one
- Familiarity with AWS EC2 and networking concepts
Step 1: Log In and Access the AWS Management Console
- Navigate to AWS Management Console.
- Search for EC2 and click Launch Instance.
- Select your region, ideally close to your location for better latency.
Step 2: Locate the Kali Linux AMI
- In the Choose an Amazon Machine Image (AMI) section, select AWS Marketplace.
- Search for Kali Linux.
- Look for ‘Kali Linux Rolling AMI’ published by Offensive Security or Kali Linux Official.
- Click Select and review the AMI pricing (usually based on EC2 usage only).
Step 3: Choose an Instance Type
- For general penetration testing and learning: t2.medium or t3.medium instances offer a good balance of performance and cost.
- For resource-heavy operations: consider c5.large, m5.large, or g4dn.xlarge for GPU acceleration.
Step 4: Configure Network Settings
- Choose an existing VPC or create a new one.
- Enable Auto-assign Public IP for SSH access.
- Add inbound rules: SSH (TCP 22) — allow from your IP only; HTTP/HTTPS — optional.
- Avoid allowing 0.0.0.0/0 unless using a VPN or proxy.
Step 5: Add Storage
- Set at least 20 GB for root volume to accommodate tools and logs.
- Optionally, add another volume for storing large capture files or results.
Step 6: Review and Launch
- Review your configuration.
- Click Launch.
- Select or create a new SSH key pair.
Download your .pem key and launch the instance.
Connecting to Kali Linux Instance via SSH
Once the instance is provisioned and ready to use, the next step is connecting to the instance. There is a few ways that AWS do provide but the most well known as well use is via SSH
The first step will be getting or finding your prefer terminal application wether is PUTTY, Wave or even the MAC Terminal command prompt will work. Once you have he desire terminal software, follow this three steps:
- Use:
ssh -i /path/to/your-key.pem ec2-user@<your-public-ip>
NOTE: Ensure to save your Keys on a safe place and DONOT share them with anyone.
- Default username might be ec2-user, ubuntu, or kali. I just recently provisioned an instance and the default account was kali
Configure Kali Tools and Environment
Once logged in, it may seem the instance looks flat, slim, lack of tools. The main reason is to allow users to customize as need based on the reason or require test. So to get the most following command to have a good, baseline images tool using the Kali’s Metapackage. Here is the command:
sudo apt update && sudo apt install -y kali-linux-headlessRunning this command will get you all of the essential tools images need to get you started. There is other ways you can accomplish this again, base on what you are trying to accomplish:
- – Install top tools:
sudo apt install kali-linux-top10 -y - – For all tools:
sudo apt install kali-linux-everything -y
Installing the GUI
If you are new to Kali Linux or Linux in general or a Microsoft Window Kool Aid drinker, there is a GUI you can install as well. Here is the command:
sudo apt install kali-desktop-xfce -yOnce the install completed, you will need to set up remote desktop with xRDP or VNC or any other RDP tool you may have available.
Hardening and Secure Your Instance
Even though this is a pentesting instance, security is still a must; therefore, here are some basic hardening steps you can perform to keep those unwanted guests away:
- Change default SSH port – As everyone know by now what port SSH use so changing the port number may be a great idea
- Use key-based authentication only – Key-based authentication will provide greater security over password-based methods, as passwords can be easily cracked if a bad actor compromises your network. Please do not share any keys unless there is a legitimate reason.
- Disable root login via SSH – you should not need to use the root account as the kali account will provide sufficient elevated privilege along with sudo too.
- Enable firewall – Using the native Linux firewall may be a great idea but if you are using a Security Group, NACL or any other Firewall technology, you may be good with that, now if you need to use the native or built-in firewall, tun this command:
sudo ufw enable; sudo ufw allow 22/tcp
NOTE: If you change the SSH port number, replace the 22 with the new SSH port number.
- Regularly apply system updates – Updates will ensure that the OS as well as all applications are kept secure from any new vulnerabilities or flaws, and will provide new features too.
Optional – Create an AMI for Reuse
Once your instance is in the desired state with all necessary tools and security hardening, create an AMI image for future use. This will save you time by avoiding repeated setups. Here’s how easy it is to create an AMI image for yourself:
- Go to EC2 Dashboard → Instances.
- Select your Kali instance → Actions → Image and templates → Create image.
- Name it (e.g., Kali-Lab-Base).
- Launch future instances from this image anytime.
One common practice observed is the removal of AMI snapshot, driven by the misconception that it is unnecessary or to conserve space and costs. However, it is advisable not to delete these snapshot, as the AMI relies on it for maintaining a point-in-time state. In essence, all modifications, package installations, and hardening procedures are preserved within that snapshot; deleting it may render the AMI invalid or corrupted.
Conclusion
Deploying Kali Linux on AWS enables you to perform cloud-based security testing, run automated scans, or practice ethical hacking from anywhere — all while taking advantage of AWS scalability and reliability.
With proper setup and hardening, you can maintain a powerful and secure remote lab environment for penetration testing, digital forensics, and cybersecurity research.
Legal Disclaimer
Kali Linux is a powerful penetration testing and cybersecurity assessment platform. When deploying Kali Linux or using any associated tools on Amazon Web Services (AWS) or any other cloud platform, you are solely responsible for ensuring that all testing activities are conducted in compliance with applicable laws, regulations, and AWS Terms of Service.
Unauthorized scanning, exploitation, or testing of systems or networks that you do not own or have explicit written permission to test may be considered illegal and could result in civil and criminal penalties.
This guide is provided for educational and authorized security testing purposes only. The author and publisher assume no liability for any misuse, data loss, or damage resulting from the use of this information or associated configurations.
Always obtain proper authorization before conducting penetration tests and operate within the boundaries of your organization’s or client’s established security policies. -
Container Security Best Practices

Containers are a great tool for developers. They are also valuable for systems administrators to simplify and rapidly deploy applications. Containers offer many other benefits. As it is still considered a relatively new technology for some organizations, it brings a set of challenges. These include implementation and defining the best use case. Do we have the proper technical skill?
But one of the many challenges amount many others, is how to best secure container deployments.
In this post, I would like to review some of the best practices. You can take these steps to implement a robust security posture for your Container Environment.
1. Secure the Container Images
- Use trusted base images: Always use official or trusted images from reputable registries.
- Regularly update images: Stay on top of security updates for base images and rebuild containers often.
- Scan images for vulnerabilities: Use tools like Trivy, Clair, or Anchore to detect vulnerabilities in images before deploying.
- Minimize the attack surface: Use minimal images (e.g., Alpine) and remove unnecessary components, libraries, and utilities.
- Sign images: Use tools like Docker Content Trust or cosign to sign and verify images.
2. Secure the Build and Deployment Process
- Implement CI/CD security checks: Scan code and images for vulnerabilities in your CI/CD pipelines.
- Use Infrastructure as Code (IaC) security tools: Tools like Checkov or kics can guarantee secure configuration in IaC.
- Restrict access to registries: Limit who can push, pull, or change container images in your container registry.
- Enforce policies: Use admission controllers like OPA/Gatekeeper or Kyverno to enforce security policies during deployments.
3. Set Containers Securely
- Run as non-root: Avoid running containers as the root user.
- Limit privileges: Use
--cap-dropto drop unnecessary Linux capabilities, and avoid the--privilegedflag. - Use read-only file systems: Set containers to run with read-only file systems unless write access is explicitly needed.
- Set resource limits: Use Kubernetes
requestsandlimitsfor CPU and memory to avoid resource exhaustion attacks. - Isolate containers: Use namespaces, cgroups, and Pod Security Standards (PSS) to isolate containerized workloads.
4. Secure the Runtime Environment
- Monitor and log activity: Use tools like Falco, Sysdig, or Datadog to detect suspicious behavior in real-time.
- Keep the host secure: Regularly patch the host OS and use a container-specific OS like Bottlerocket or Flatcar Linux.
- Network segmentation: Use Kubernetes Network Policies to control traffic between pods and enforce the principle of least privilege.
- Enable SELinux/AppArmor: Leverage security modules to add an extra layer of runtime security.
5. Secure Access and Secrets
- Use secret management solutions: Tools like HashiCorp Vault, AWS Secrets Manager, or Kubernetes Secrets (with encryption) should manage sensitive data.
- Use secure authentication: Enable role-based access control (RBAC) for container orchestration tools like Kubernetes.
- Avoid embedding secrets in images: Use environment variables or volume-mounted secrets instead.
6. Automate and Audit Security
- Automate compliance: Use tools like Kubernetes Bench or Kubeaudit to confirm compliance with CIS benchmarks and other standards.
- Perform regular security assessments: Periodically conduct penetration testing and container-focused vulnerability scans.
- Enable logging and monitoring: Centralize logs with tools like ELK, Fluentd, or Prometheus to detect and respond to incidents.
7. Use Zero Trust Principles
- Microsegmentation: Isolate workloads to limit lateral movement.
- Mutual TLS (mTLS): Use service meshes like Istio or Linkerd to secure communication between services.
- Limit ingress/egress: Restrict external communication to only what’s necessary.
8. Educate and Train Teams
- Secure coding practices: Train developers to write secure code and recognize vulnerabilities.
- Understand containerization: Make sure your team understands container-specific threats and how to mitigate them.
- Threat modeling: Regularly conduct threat modeling to foresee risks.
Key Tools to Use
- Image Scanning: Trivy, Clair, Anchore
- Runtime Security: Falco, Sysdig, Aqua Security
- Policy Enforcement: Kyverno, OPA/Gatekeeper
- Secret Management: Vault, AWS Secrets Manager
- Monitoring and Logging: ELK, Fluentd, Prometheus
By implementing these best practices, you can significantly reduce the risk of vulnerabilities in your containerized environment.
Cheers!
-
How to implement good API Security

API have become essential tools for application integration, data analysis, automation, and many other technological tasks. Yet, this widespread reliance makes them a prime target for hackers and other malicious actors. Without proper security measures, API—across production, test, and development environments—are vulnerable to sophisticated attacks that can lead to significant breaches.
First, let’s define what an API is. Then, we will dive into some of the key elements of how we can secure API. We will also discuss some of the major use cases.
What is API
An API or Application Programming Interface is a set of rules and tools. These rules allow different software applications to communicate. They also allow them to interact with each other. It defines how requests and responses should be structured. This enables developers to access functionality or data from another service, system, or application. They can do this without needing to understand its internal workings.
For example, a weather app might use a weather service’s API to fetch current temperature and forecast data.
API are often used to allow communication between different systems, platforms, or components of an application. They allow developers to access specific features or data of an application, service, or device without exposing its entire codebase.
In other words, it allows developers or any engineer to interact with any software or application utilizing code. This is mainly from the backend, which is great for not exposing or altering any data.
Major Use Cases of API
Here is a list of must predominant Use Cases of API Platforms based on research I did as well based on my experience working with clients and organizations:
- Service Integration: Connect apps and services (e.g., payment gateways, social media).
- Mobile Apps: Power features like weather data, maps, and more.
- Data Sharing: Fetch and exchange data between systems (e.g., news, financial data).
- Automation: Automate workflows and tasks (e.g., email marketing, scheduling).
- Cloud Services: Manage storage, computing, and other resources (e.g., AWS, Google Cloud).
- Authentication: Allow third-party logins (e.g., Google, Facebook OAuth).
- E-commerce: Integrate inventory, shipping, and payment features.
- IoT Devices: Ease communication for smart devices (e.g., Alexa, Fitbit).
- AI/ML: Access AI tools for NLP, image recognition, etc.
- Gaming: Support leaderboards, multiplayer, and VR/AR integration.
- Finance: Allow open banking, digital wallets, and fintech apps.
- Monitoring: Give analytics and performance data (e.g., Google Analytics).
Why API Are Important
API are important, mainly for the next reasons:
- Interoperability: API allow systems to work together regardless of platform or language.
- Efficiency: API streamline processes, eliminating the need for custom-built solutions.
- Scalability: API allow modular development, making it easier to scale systems.
- Innovation: API empower developers to create new applications and services by leveraging existing tools and data.
I’m sure they are many more though, this fourth are consider the main reason of using API
We now have a comprehensive understanding of API This includes their major use cases and importance. Let’s dive into the key elements of an effective API security framework.
The Key elements of an effective API Security Framework
- Authentication and Authorization: Using established standards like OAuth 2.0 for user authentication and granular access control based on scopes and claims. This will offer a great first line of defense. Only authorized users will have the necessary permissions to carry out the task or job at hand. Implement strong password policies. Consider MFA to have a robust security posture. Make sure to have a good password rotation policy in place.
- Encryption: Always use HTTPS to encrypt data transmitted between the API and clients. You will be surprised as I see clients use HTTP mainly on Dev and or Test environment. This should always be a red flag. Nowadays, all application API endpoints support HTTPS. In fact, most of them stop supporting HTTP or block any connection by default. So HTTPS please! Consider encrypting sensitive data at rest. This responsibility falls more to the Infrastructure team. Nonetheless, everyone should make sure they have encryption enabled at the Server Side. It’s important to have encryption on personal devices too.
- Input Validation: Validating all user input parameters is a most. This would help preventing injection types attacks like SQL Injections or XSS. There is a Code Control solution like GitHub It helps with versioning, code checks, and collaboration. Use this before releasing any code or parameters to any platform. This step leads to the next item, sanitize input data before processing.
- API Gateway: Use an API Gateway will guarantee centralize security controls and enforce access policies. Many Cloud Provider do offer an API gateway or Endpoint.
- Monitoring and Logging: Continuously monitor API activity for suspicious patterns and anomalies. Implement detailed logging to track API requests, responses, and errors. There is quite a lot of platform that allows to implement great observing and logging like Splunk, etc.
- Security Audits and Penetration Testing: Regularly conduct security audits. Carry out penetration tests to find vulnerabilities and potential attack vectors. This initiative is highly recommended. Conduct audits every 6 months as a starting point. But, business requirements and API use cases need more frequent audits or at least yearly ones.
- API key Management: When securely managing API keys, consider rotation, expiry dates, and limiting access. Always keep track of whom we share or give keys. They pass them along among users. I have seen this quite a lot too.
- Error Handling: Design error responses to avoid leaking sensitive information. Develop a strong error response process. It will help prevent data leaks or environment exposure. This will stop hackers from developing more complex attacks.
- Rate Limits: Implement rate limiting to mitigate brute-force attacks and prevent excessive API usage.
- Zero Trust Architecture: If you haven’t heard of the “Never trust, always verify” saying, let me explain. This approach is very effective because it assumes potential threats from all sources. In other word, DON’T TRUST NO ONE.
Some Key Considerations:
Now that we found some of the most important elements of an effective API Security Framework, let’s find some important considerations when building your API Security Framework:
- API Design – As a best practice, always focus on security first. This includes your API platform. Clear documentation is a must. This will help in maintaining consistency on how to run, protect and even keep up your API platform. Incorporating robust access control will keep things tight and better controlled too. This will guarantee you keep a very high security posture across your environment. It prevents bad actors, ransomware, or any other cyber attacks. These can have a very negative impact on your business or organization.
- Least Privilege Principle – Do not give the entire Keys to the Kingdom. Do not give root or admin accounts to anyone. Grant only the least necessary access levels and offer other access as need and with others approval process.
- Versioning – Keep your old versions thigh too as they can also leak data or critical information of your Infrastructure. Avoid sharing or storing old versions in none-secure or unencrypted storage or any other unencrypted system.
- Compliance – Follow your industry security standard and or regulations. They will offer great insight and guidance on who to properly keep good security best practice. If your Organization doesn’t have any compliance to follow, look for a business like yours. See what Compliance Governor entity they follow. If you have customers, find out what compliance standard they must adhere to and adopt it.
I hope this serves as a helpful starting point for adopting a solid API security framework. Stay tuned as I dive deeper into each of these elements in future posts—there’s much more to explore!
Cheers.
-
AWS Hand-On Tutorial Experience

The AWS Hand On Tutorial page it’s a great resource to learn AWS It provide step by step on how to perform or deploy certain workloads, application or utilize a vast of their Services. And the best part, it is free.
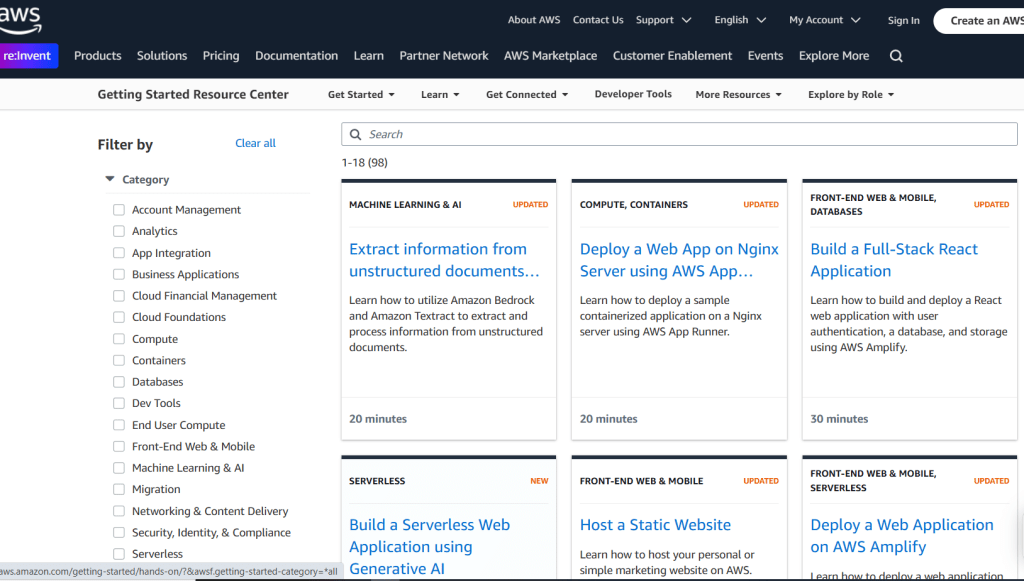
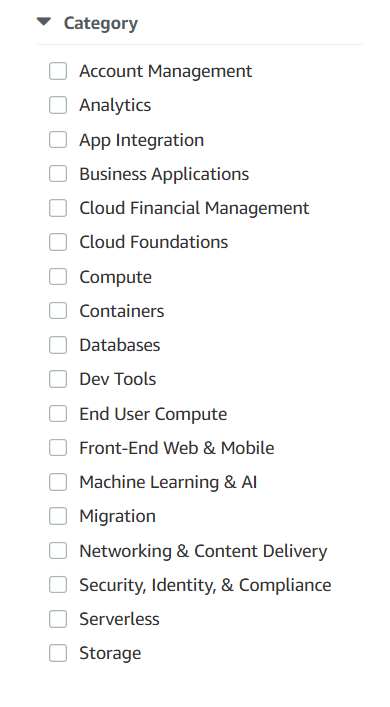
Navigating the Site is very straightforward, with a filter column to where you can specify the category or categories you are mainly looking to focus on:
Now, if you are very new to AWS or have very basic knowledge, the Get Started Center is a way to get your feet wet but for now, I will be focusing with the Hands On Tutorial.
I few college asked me if it a great resource to studying for any AWS exam, it depend! Yes you can use this as a way to validate knowledge, perhaps build knowledge around scenario based as you will be deploying workloads with certain services. Some other tutorials will help you understand more about certain consoles or services such as User Management, IAM, etc.
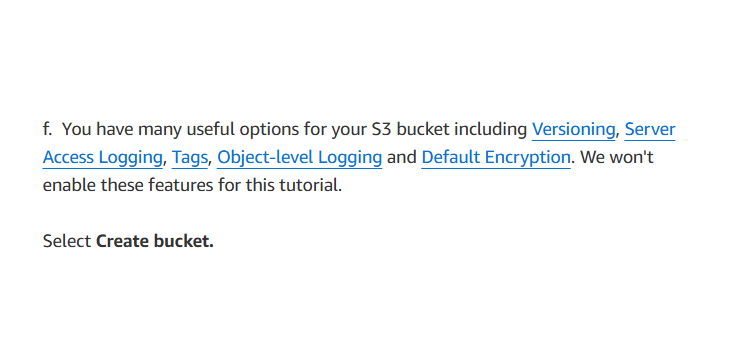
Once you find and select a Hand-on lab, the layout, content and font is very easy to follow and read. It does provide quite a lot of images which are great reference in case you get a bit lost or behind. I do also find very beneficial all the URL across the entire lab guide. They will take you straight to service specific public page or to specific section within the AWS Documentation Guide.
I strongly suggest to get this a try, get some Hand-on labs done and provide feedback as AWS may find them very useful to continue developing more and maintain them relevant as technology evolve. Cheers!
-
Nutanix Cluster NCC host resolution check warning alert

For the past few month, I been troubleshooting for what seems to be DNS related issue which trigger a warning alert. I tried multiple steps such as:
- Check all DNS records are in DNS
- Ensure no ACL or Firewall is blocking ingress / egress traffic from to CVM via port 53
- Ensure DNS Servers IP are consistent in ESXi as well in PRISM UI
After all this, everything seems to be in good standing but the alert still coming back. Ran the NCC check via CLI and same result. I reference this KB from the Nutanix Support Portal (1709) but still same issue.
After verifying my primary and secondary DNS Servers, I realize that the location of the other DNS server wasn’t local or was on the other side of the country so I decided to remove the remote DNS Server. Once I removed it from PRISM and ESXi, the CVM started to resolving IP to Hostname and Hostname to IP Address and the check result change to PASSED:

Now, the only issue I have with this, single DNS Server therefore, I opened a case with Nutanix Support to further investigate this matter. I will keep update this post once I get in a Zoom with Nutanix.
-
How to change the default ADMIN password on AHV

If you forgot the ADMIN password for your AHV Hypervisor node but never did change the nutanix account password, you still have to opportunity to reset those password or hardening them as well.
First, login to the AHV Hypervisor via SSH using the nutanix account. The default password notmally is nutanix/4u
Second, we will start by resetting the Admin Password so run the following command:
sudo passwd admin

Then, type the new password and confirm the new password:

You should get a Successful respond as illustrate above.
Now, we will reset the nutanix as well root account password. To do this, log in with your admin account using the newly reset password we did previously.
Repeat same steps we follow when we reset the admin account.
This time it will asked you to provide the admin credentials before elevating the command:
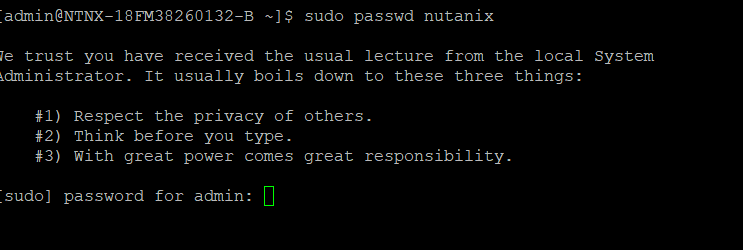
Then proceed to type the new password and confirm it. Follow same process with the root account.
-
Create a sudo user in CentOS

This article describes the process of granting sudo access to a new or existing user on CentOS
Create a new user by using the adduser command followed by the new user’s <username> as shown in the following example:
[root@funserver ~]# adduser bobby
Use the passwd command followed by the new user’s <username> to set up a password for bobby user. Enter the new password in the verification prompt twice.
[root@funserver ~]# passwd bobby
Changing password for user bobby
New password:
Retype new password:
passwd: all authentication tokens updated successfullyNow we have a user created however, this users only have the least privilege therefore we have to elevate them otherwise wouldn’t be able to do much with the user bobby.
Grant root permissions to a new or existing user
Edit the sudoers file by using the following command:
[root@funserver ~]# visudo
You then see a version similar to following text:
## Next comes the main part: which users can run what software on
## which machines (the sudoers file can be shared between multiple
## systems).
## Syntax:
##
## user MACHINE=COMMANDS
##
## The COMMANDS section may have other options added to it.
##
## Allow root to run any commands anywhere
root ALL=(ALL) ALL
## Allows members of the ‘sys’ group to run networking, software,
## service management apps and more.
# %sys ALL = NETWORKING, SOFTWARE, SERVICES, STORAGE, DELEGATING, PROCESSES, LOCATE, DRIVERS
## Allows people in group wheel to run all commands
%wheel ALL=(ALL) ALL
## Same thing without a password
# %wheel ALL=(ALL) NOPASSWD: ALL
## Allows members of the users group to mount and unmount the
## cdrom as root
# %users ALL=/sbin/mount /mnt/cdrom, /sbin/umount /mnt/cdrom
## Allows members of the users group to shutdown this system
# %users localhost=/sbin/shutdown -h now
## Read drop-in files from /etc/sudoers.d (the # here does not mean a comment)
#includedir /etc/sudoers.dPress the i key on your keyboard to enter insert mode. Next press the j key to move the cursor down and the k key to move it up to the following section:
## Allow root to run any commands anywhere
root ALL=(ALL) ALLAdd the newly created user by inserting <username> ALL=(ALL) ALL on a new line as show in the following example:
## Allow root to run any commands anywhere
root ALL=(ALL) ALL
newuser ALL=(ALL) ALLPress the i key to exit insert mode, followed by typing :wq to save and exit.
Verify permission change
Now that we have an su user with some power, we need to ensure we can elevate to su with our newly create user.
Use the su command followed by – <username> to access the new user account.
[root@funserver ~]# su – bobby
[bobby@funserver ~]$Use the sudo -i command to test if the new user account can elevate permissions. Enter the new user’s password. Verify these steps by using the following example:
[bobby@funserver ~]$ sudo -i
We trust you have received the usual lecture from the local System
Administrator. It usually boils down to these three things:
#1) Respect the privacy of others.
#2) Think before you type.
#3) With great power comes great responsibility.
[sudo] password for bobby:
[root@funserver ~]#Use the whoami command to verify you are currently the root user.
[root@funserver ~]# whoami
rootPlease, be mindful as this can have some legitimate reason to elevate an account before elevating any account. Cheers ~
-
Moving vDisk between Storage Container in Prism Central
With the latest Nutanix Prism Central version, now Nutanix Admin do have the capability to move vDisk between storage containers.
Nutanix since the beginning, always had the capability and provide the flexibility to create storage containers and enable to proper storage policies for efficiency such as Compression, Dedupe, EC-X Now, with PC be able to re-allocate vDisk to ensure the are in the proper container with correct Storage Efficiency Policies enabled. This will maximize performance and ensure best used of storage capacity.
The process is very simple, first navigate to the VM section under the Compute and Storage in Prism Central. Then, select the Virtual Machine need the vDisk migrate. Select the Action Ribbon and click on Update.
It will open the VM update Wizard Page:
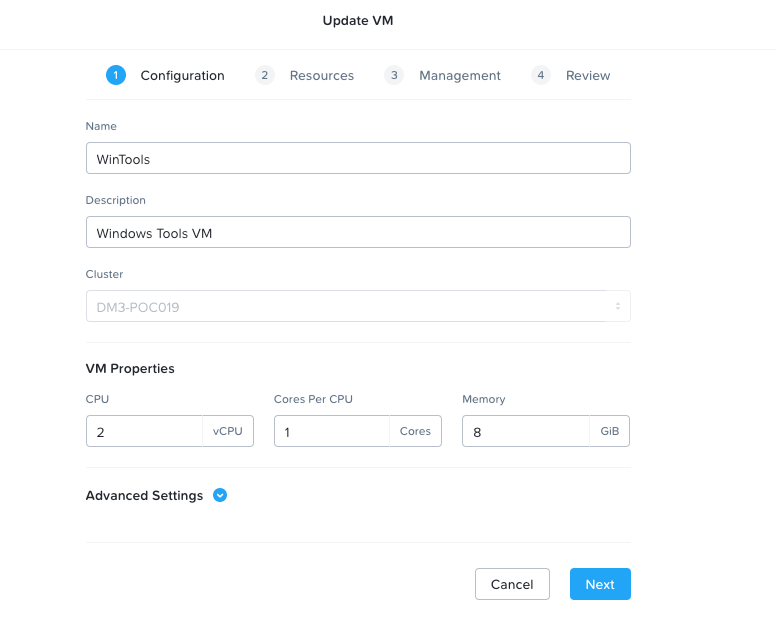
Then, navigate to the Resource Page under the Update VM Wizard, select the Disk need to be migrate to new Storage Container and Select Edit.
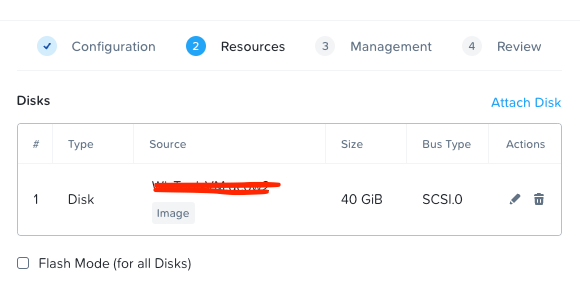
This will take you to the Update Disk Section or Page:
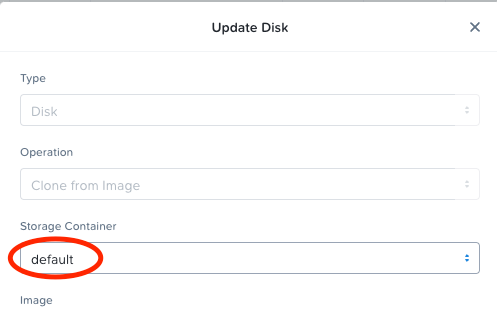
As you can see, I have the Default Storage Container however, I created a new Storage Container with more specific Storage Efficiency Policies for this particular VM so I will click the drop down arrow, look for my new Storage Container and select:
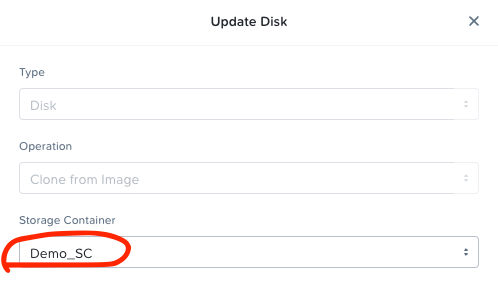
Hit Save and move on with Updating the Virtual Machine Wizard.
A quick Note, depend of the size of the vDisk, it can take as only as 10 seconds to a few minutes, again, it all depend of the size of the vDisk.
We would like Nutanix continue on developing more on this as this was a long due ask for sometime now from customers and us Technology Afficionadors.
Until later!!
-
Hello World!

I been in the IT Industry for quite sometime now, can believe! Almost 20 years!! It is a long time and with this amount of time, experience, challenges and skills had been learned.
I’m a true believer that sharing is carrying so I decide to share some of the knowledge, notes, experience I encounter for those Technologist out there perhaps those starting this journey.
Again, may years started as an PC technician back in the late 90s and work my way up, I know sounds cliches, to now be a Cloud Architect, with a passion in everything technology, except spend hours with Internet Service Providers in the middle of the night! Shout out to those Network GURUS spending time with ISPs much love and respect for them!!
I hope this can help and again, it is a platform to share knowledge perhaps comments are welcome with constructive feedback as I put quite sometime on building all the materials and it only represent my self and opinion.
-
Veeam Backup and Replication Error: Failed to open VDDK Error Message

PROBLEM:
Certain VMs are unable to being backed up due to error message Error: Failed to open VDDK disk datstore_name_VM_Name.vmdk] ( is read-only mode – [true] ) Failed to open virtual disk disk datstore_name_VM_Name.vmdk (flags: 4) Logon attempt with parameters [VC/ESX: [vcenter_server];Port: 443;Login: [account_name];VMX Spec: [moref=vm-56235];Snapshot mor: [snapshot-68079];Transports: [nbd];Read Only: [true]] failed because of the following errors: Failed to open disk for read. Failed to upload disk.
CAUSE:This issue is related to connection between Backup Proxy and ESXi Host via Management Agent.
RESOLUTION:
Identify the VMs being affected, then see if they are all belong to the same host, then proceed to the following steps:
1. Log in to SSH or Local console as root on the host in question.
2. Run these commands:
/etc/init.d/hostd restart
/etc/init.d/vpxa restart
3. Run this command to verify if hostd is running:/etc/init.d/hostd status
4. If the ESXi Host is manage by a vCenter Server, run the following command to verify if the vpxa is running:
/etc/init.d/vpxa status
5. Re-Try the Backup Job.
If the problem persist, ensure that the account you are using to run the job have full access to download files on the datastore by login in to vCenter with those credentials, then proceed to explorer the content on the datastore were the VMs affected resides, then open the VM folder and identify the file on the message. Try to download the file in question, if it fail with Access Denied or not have permissions, then the issue is related to permissions therefore, provide Administrator Role to the account on vCenter. Also, make sure you are using the right Transport Mode for your proxy or proxies, please refer to the Veeam Backup & Replication Documentation for more information pertaining Proxies and Transport Mode.
Hope this helps!
Home
1–2 minutes

